Are you ready to ignite your creativity and illuminate your space with unique and colorful candles?
In this step-by-step guide, we’ll show you how to make candles with crayons. With just a few materials and a little bit of imagination, you can transform ordinary crayons into stunning homemade candles.
From choosing the right crayons to pouring and setting the candles, we’ll take you through each process with precision and detail.
Get ready to bring a touch of innovation to your candle-making journey.
Choosing the Right Crayons
To make the best candles, you’ll want to choose the right crayons for the job. When it comes to choosing the right colors, think about the mood you want to create with your candles. Bold and vibrant colors can bring energy and excitement, while softer pastel shades can create a more calming atmosphere. Experiment with different combinations to find your desired effect.
As for melting techniques, it’s important to use a double boiler or a dedicated melting pot to ensure even heat distribution and prevent scorching. Safety precautions should also be taken, such as wearing gloves and protective eyewear, as melting crayons can release fumes.
If you’re looking for alternative crayon options, consider using soy-based or beeswax crayons for a more natural and eco-friendly choice. Lastly, if you encounter any issues like air bubbles or uneven coloring, troubleshooting tips can be found in the subsequent section on preparing the candle wax.
Preparing the Candle Wax
After melting the crayons, you can prepare the candle wax by adding in any desired scents or colors. Here are some important steps to follow in order to ensure a successful candle-making process:
- Melting process: Use a double boiler or a microwave-safe container to melt the wax. Be sure to monitor the temperature closely to avoid overheating.
- Temperature control: Maintaining a consistent temperature is crucial for achieving a smooth and even wax. Use a thermometer to monitor the wax’s temperature and make adjustments as needed.
- Filtering wax: To remove any impurities or debris, strain the melted wax through a cheesecloth or a fine mesh sieve before pouring it into the candle molds.
- Safety precautions: Always prioritize safety when working with hot wax. Use heat-resistant gloves and goggles, and work in a well-ventilated area to prevent any potential accidents or injuries.
Adding Color and Scent
Once the wax has been filtered, you can begin adding color and scent to create customized candles. When it comes to coloring your candles, there are alternative options to traditional dyes. Consider using natural ingredients like beetroot powder, turmeric, or even coffee grounds for a unique and eco-friendly touch.
For fragrance, DIY fragrance oils are a great choice. You can experiment with different essential oils and create your own signature scent. Mixing different scents allows you to create complex and captivating aromas.
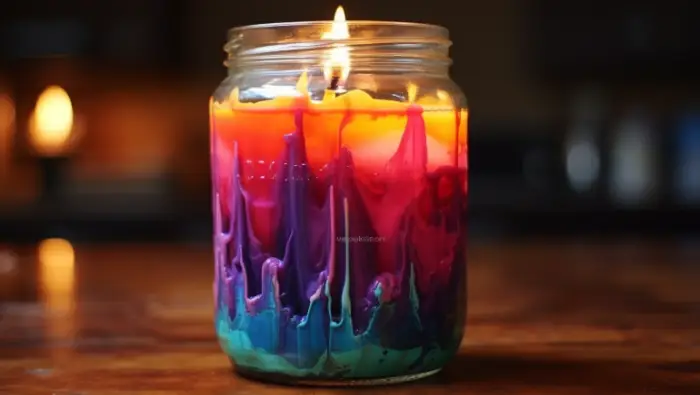
To add an extra visual element to your candles, try layering colors and scents. This technique creates a stunning effect when the candle burns. Don’t forget to add decorative elements like dried flowers, herbs, or even glitter for an added touch of creativity.
Creating the Candle Molds
When creating the candle molds, it’s important to choose a material that is heat-resistant and can withstand the melting wax. Here are the materials needed for creating the molds:
- Heat-resistant material: Look for materials such as silicone or metal that can withstand high temperatures without melting or warping.
- Mold containers: You can use various objects as mold containers, such as mason jars, tea cups, or even empty food cans.
- Mold release agent: To ensure easy removal of the candle from the mold, use a mold release agent like cooking spray or vegetable oil.
- Optional: If you want to create unique shapes, you can also use pre-made molds or create your own using materials like clay or plaster.
To create unique shapes, consider these tips:
- Use silicone molds with intricate designs or patterns.
- Experiment with different objects for mold containers, like seashells or fruits.
- Add texture by lining the mold with materials like lace or burlap.
Common mold issues and their troubleshooting:
- Air bubbles: Tap the mold gently on a surface to release any trapped air bubbles.
- Wax sticking to the mold: Apply a thin layer of mold release agent before pouring the wax.
- Uneven surface: Level the mold by placing it on a flat surface during the pouring process.
- Difficulty removing the candle: Freeze the mold for a few minutes to help release the candle easily.
Pouring and Setting the Candles
To pour and set your candles, start by carefully melting the wax in a double boiler until it reaches the desired consistency. This step is crucial in achieving a smooth and efficient pouring technique.
Once the wax is melted, you can begin pouring it into your prepared candle molds. Be sure to leave some space at the top for the wick.
The setting time for your candles will depend on the type of wax used, but it typically takes a few hours to fully harden. During this time, it’s important to troubleshoot any issues that may arise, such as air bubbles or uneven surfaces.
Once your candles are set, you can explore various decorating options, like adding dried flowers or using different colors of wax. Remember to always prioritize safety precautions, such as working in a well-ventilated area and keeping a fire extinguisher nearby.
Conclusion
Now that you’ve mastered the art of making candles with crayons, you’re ready to light up any room with your creativity!
Choosing the right crayons and preparing the candle wax were just the first steps in this colorful journey.
By adding your favorite scents and colors, you’ve created unique candles that are sure to impress.
And don’t forget about the candle molds – they play a crucial role in shaping your creations.
Lastly, pouring and setting the candles requires patience and precision, but the end result is worth it.
So go ahead, unleash your inner artist and let your homemade candles shine like a diamond in the rough.