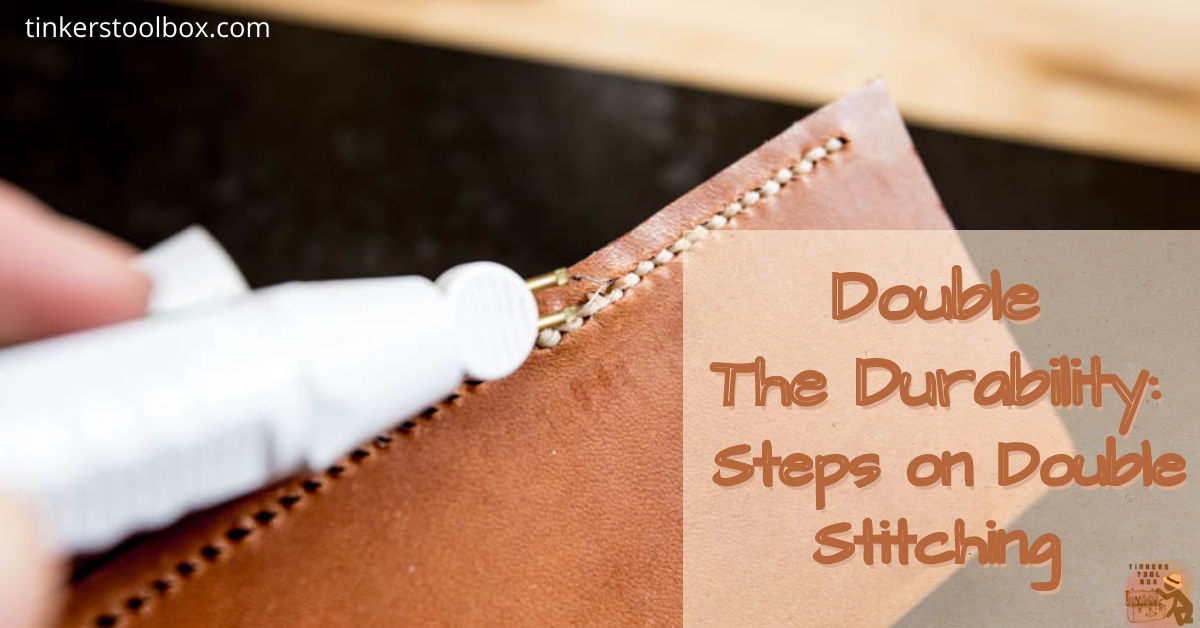
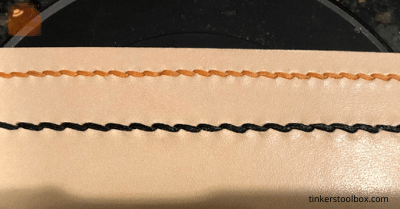
Double stitch or saddle stitch is one of the most used stitches in leather crafting. It is known for its more robust stitching method because it contributes to the crafted leather durability. Since it has two threads in one hole, the other thread can still hold when the other breaks. Doing this will promote a more durable leather stitch and help you hone your skill, extend your patience and enhance your focus. It is not only for assembly but also for repairing ripped or torn leather.
How to double stitch leather? The first needle is inserted into the first pre-made hole to check the threads’ even distribution on each leather side. The second needle is inserted in the same hole but opposite directions with an eight-figure motion.
Learning double stitching skills at first is quite a challenge. When I first got interested in leather works, double stitching was the skill I had to work on for some time. Once you get a hold of it, it completes your leathercraft and brings out your creativity towards your leather produce as what I experience. Learning this is indeed fulfilling. This article will talk about how to double stitch leather correctly to get that neat stitch you desire. I’ll also give you a few tricks I learned that would surely help you in your double stitching journey.
- Gather Up The Essential Tools: What You Need
- Prep the Thread: A Prerequisite For Smooth Double Stitching
- Pre-Mark The Leather: Making Holes Efficiently
- Hold It Still With A Stitching Pony: Stitching With Both Hands
- Getting It Done: Starting the Double Stitching Proper
- What To Aim: Finishing a Line of Stitching
- Tips To Achieve a Safe and Smooth Double Stitching
Gather Up The Essential Tools: What You Need
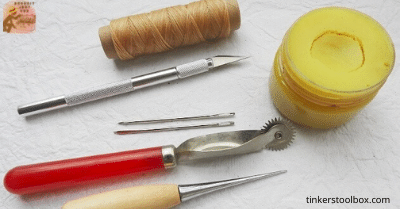
The preparation of the leather stitching tools is the key to begin with. These tools will help you get ready for double or saddle stitching since it is not the usual sewing that needs one needle.
Leather Stitching Tools
You will need two sewing needles considering they will be inserted at each end of the thread. Hand stitching thread is required. Also, a waxed thread is another essential tool in stitching, for it helps the thread be stronger and more repellent to water. It also helps the line to last longer.
A sewing awl which is used to make holes on your leather before stitching is necessary. Another essential tool is the stitching clamp that functions as the third hand that holds the leather during the sewing process so you can concentrate both of your hands in stitching.
Leather pricking iron is also prepared for it is the tool that strikes the marked leather surface to make holes for stitches. It is paired with a mallet. A leather mallet is an excellent tool for punching holes so that pricking irons or any stitch marker can hit through the leather. A leather wing divider must also be prepared to mark the leather surface before punching holes for stitch markers like a chisel or pricking iron.
Prep the Thread: A Prerequisite For Smooth Double Stitching

Threading needles is done with the help of waxing. However, a waxed thread is not enough in saddle stitching because it must be appropriately threaded into the sewing needles.
Proper Way To Wax The Thread
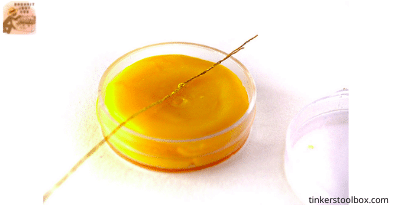
In thread waxing, you can use beeswax or a candle to straighten the thread and to avoid tangling during stitching. These waxes are made of natural materials that are easy to acquire at stores and friendly to use.
For a start, measure and cut the thread. Put the thread in one of the holes (for beeswax sewing thread), hold the threads into the candle, and pull it. The waxed threads are now ready for stitching.
Threading Needles The Right Way

Start by cutting the tip of your leather hand stitching thread, forming an angle to make it easier to pass through the eye of the needle. Insert and push the leather hand stitching thread into the sewing needle. Once inserted, pull at least an inch of the leather hand stitching thread. Then bring the longer piece of thread to the leather.
Make a hole in the thread by twisting and opening its strands. Push the needle between the extended strands of thread. Now pull down the pierced leather hand stitching thread and notice the knot formed in it. Lock the leather hand stitching thread by twisting until you reach the tip of the short-length thread. Apply wax if necessary to the leather hand stitching thread to keep them together. To thread the second sewing needle, repeat the same steps. Make sure to distribute the leather hand stitching thread evenly.
Double stitching is not the same as the usual sewing activity; thus requires a proper way of threading needles. It will help you thread needles easier. A properly thread needles help the thread stay in place during the stitching process and help you stitch leather smoothly.
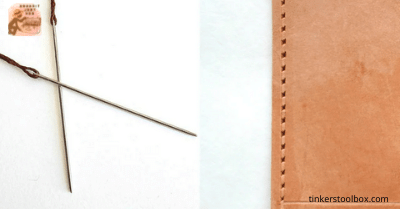
Pre-Mark The Leather: Making Holes Efficiently

Pre-marking the leather is necessary when stitching. It serves as a guide where the needle will go through in the stitching process. These holes will ensure that you will get a straight and evenly spaced stitch line.
Tools Needed
- Pricking iron
- Scratch awl
- Diamond chisel
- Leather Mallet
Pre-marked Holes: How To Make It
Choose your leather that gives the best hand stitching training. The tools mentioned are very useful in making leather marks or holes. You can also use the leather wing divider to mark the leather area for stitching holes. Then, utilize the accurate size of the leather pricking iron depending upon your target leather stitching.
Point the leather pricking iron on the marked leather surface. Now use the leather mallet by punching the leather pricking iron gently to make holes. Make sure that space is evenly distributed as you move to the next striking area for stitches holes. Continue gently doing this to have clean stitch holes. Once done with pre-marking the leather with the appropriate stitch holes, your leather is now ready for stitching.
Hold It Still With A Stitching Pony: Stitching With Both Hands

To get a comfortable manual stitching experience, using a stitching pony or clam is necessary. You can saddle stitch with both hands without the worry of uncontrollable leather movements.
Using The Stitching Pony

Place the leather to the stitching clamp, also called a stitching pony. Make sure to place on top of the clamp the parts of the leather that needs stitching. Begin with threading the first hole closest to you. Hold both needles up, and make sure to distribute the thread evenly on each side of the leather. Now, both of your hands are holding needles. You can now proceed to the actual double stitching. Placing the leather to the stitching clamps/ pony ensures alignment of the leather stitching holes.
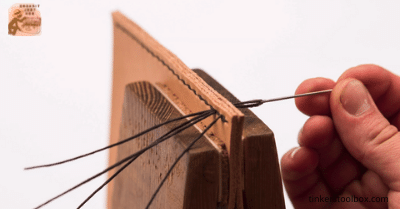
Getting It Done: Starting the Double Stitching Proper
Now that the tools are prepared, and the leather is held in place by the stitching pony, you can start creating the saddle stitches you desire.
How To Manually Double Stitch Smoothly

Pass the threaded needle through the first hole. If the first stitch starts with the left hand’s use, follow the left-hand stitching-right hand stitching pattern. However, if the right hand is used on the first hole, follow the right-hand stitching-left hand stitching pattern. Also, pass the other threaded needle through the first hole while following the hand stitching pattern. The second threaded needle must be inserted behind the first thread.
When two threaded needles have passed through the first hole, take the first threaded needle and insert it into the next hole following the same pattern. Do not forget to pull the thread firmly away from the leather after every stitch. Push the second threaded needle again to the same hole while following the same pattern, like placing it behind the first thread inserted.
Keep stitching and always follow a hand stitching pattern for every stitch. Following every step of double stitching helps you perfect your leatherwork. Placing the leather to the stitching clamps/ pony enables you to use both hands in double stitching.
Distributing hand stitching thread equally on each side of the leather helps your line reach the last stitching holes evenly still with two threads. Insert the second thread behind the first thread to help you achieve perfect stitches because it provides uniformity of stitches and avoids bumpy or irregular stitches. Pull the thread tightly every after stitches, keep the leather edges nice, firm, and close. Always following the same pattern of left-hand or right-hand pattern gives an even stitch.
Mechanically Done: The Possibility of Double Stitching In a Sewing Machine
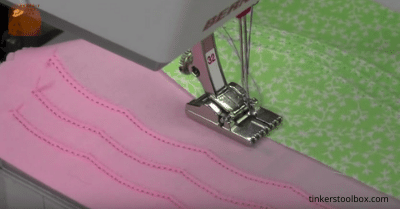
Do not limit yourself to manual double stitching. If you want a faster and easier option, you can always opt to get it machine done. Remember, though, that double stitching is usually or normally done manually. One option to get a durable stitch minus the hassle of intricate manual sewing is to use a machine with double needles. This method is only possible if you have a zig-zag sewing machine or a typical straight one, but you have to double the seam. In this setting, it is usually called double-needle sewing. This is ideal if you are doing projects that are a handful in quantities.
Another Option: One Needle Double Stitching
The standard method in sewing leather is double stitching which usually involves two needles. However, double stitching or saddle stitching is possible with one needle. One needle stitching is similar to the two-needle hem, which fills all the stitches on both sides of the leather. Hence, this section will present the step-by-step process of one double-needle stitching.
The process is similar to double stitching, which includes pre-punched holes for leather stitches using pricking iron. You can stitch without the use of a stitching pony. Hold the leather to align its seam. Start stitching by inserting a needle into the first hole.
As you pull the thread, make sure to leave at least 2 inches of tail length. Then push your needle to the second hole of the leather seam. It will now create a single stitch. Insert the needle into the first hole again. For the second time, pass the needle to the second hole of the leather seam. Now you have created a loop that will lock the end of the thread in its place.
Then start sewing the whole seam in a single stitch which will result in a dotted-like line. Pull the thread tight every after stitches so that the leather would not be distorted (especially if it is flexible). After reaching the last hole, stitch back in the opposite direction to fill the stitches’ in-between spaces.
When you have reached the first seam, lock your thread. Lock the thread in place through backstitching to a few holes, around two to three. Using scissors or a knife, cut the thread close to the leather.
What To Aim: Finishing a Line of Stitching
As you go along with your double stitching and finish a line, specific procedures must be strictly followed. It is in this stage where strong leather stitching is achieved; backstitching is applied. A backstitching or a backstitch simply means stitching backward, and it is used to give the durability of leather.
Strong Leather Stitch: How To Do Backstitching
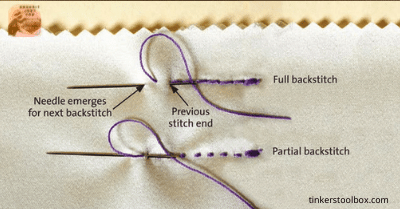
After reaching the last hole, backstitching must be applied. Insert the first needle behind and also push the second needle. While inserting and passing needles in the backstitching process, make sure to pull the thread very tight every after backstitching. Pulling the thread tightly after backstitching will give a consistent stitching result. Backstitching can be done two to three times for a more robust leather.
Secure the Stitch: Cutting and Locking

Make sure to secure the stitch line, which is done after backstitching. This is the finishing stage of your leather stitching. Prepare a knife like a Xacto to cut the end of a thread. Hold the end of the thread, then cut it using a knife. Then press down the tiny end of a thread against the stitching. This is the last step of stitching.
Remember to try stitching in a piece of leather scrap or other sewing materials before the actual leather stitching. Avoid mistakes because to undo stitches, leather will be weakened. Always leave long threads at the start and at the end of stitching for tying. When you are a beginner in leatherworking, always start with a small project in sewing with leather.
Stitching Thick Leather

In stitching thick leather, use leather glue in gluing the leather pieces you want to sew so that the leather seam would align. The thickness of the leather makes stitching difficult hence pierce its holes by using a sewing awl.
Always hold the awl in a straight matter. Do not pierce leather at an angle. Through the use of an awl, punch the leather holes for it to enlarge, which is now capable of backstitching. Make sure to do the backstitching when you have reached the last spot. Never forget to cut the end of the thread close to the leather. Burn to melt the cut thread to prevent fraying. For the second time, run over the stitch through a stitching wheel to be more even.
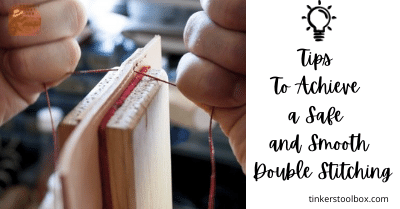
Tips To Achieve a Safe and Smooth Double Stitching
The secret of sewing leather lies in strictly following the step-by-step process of stitching and knowing some tips or techniques from the expert. These tips include not only mastering the skill of double stitching as well as to avoid injuries while sewing.
Experience a Smooth Stitching Process

Always prepare the materials and tools beforehand. Plan out your workflow carefully, putting into account what you want to achieve. Make sure to prepare the working area free of unnecessary steps because an organized area will help you think and focus on the project you are working on. Sharpen your tools and use appropriate instruments and leather for your project to maximize your effort and resources.
How to Keep Injuries At A Minimum
Wear your protective eyewear while punching the leather in making holes for a seam. Always leave a one-inch space between the tools and finger in using awl and punchers. Stay focused on the stitching process, and never leave your working area uncleaned. Keep the sewing tools like knives, scissors, awls, needles, thread, etc., to avoid foot or hand injuries.
Conclusion
Leatherworking always involves sewing and stitching. In stitching, double or saddle stitching is common because of its even and durable stitches. Double stitching may look easy where you have to follow a simple pattern, but it will be difficult for beginners, mostly on thick leather. Nevertheless, the key to double stitching is consistency in carrying out simple patterns, following its process and observing safety precautions.