There are a lot of leather types used in crafting things. Perhaps, thick or thin leather is possibly subject to folding and many other activities. Generally, leather is cut then sewed to create a project, yet skiving it ahead of these activities will help you carry out the task efficiently. Skiving leather is typically done to reduce its thickness to fold the leather, bend it, crook, angle, and shape it smoothly. Skiving pertains to the shaving off of the top surface of the leather to make it less sturdy. Still, several reasons are behind in leather skiving.
How to Skive Leather? Make sure tools are polished and sharpened. Select and use the best knife. Start by placing the leather on a good solid, and sleek surface. Skive away by gliding the knife in the leather or use a skiving machine to get the desired thickness.
Skiving is always applied in leather crafting, for it helps make so many leather products. It is tricky since undoing in skiving is impossible because you can not add leather if you have shaved off thicker leather surfaces. This is why skiving for beginners must be done slowly to make an accurate shaving level. Today amid the COVID-19 pandemic, you can start or maybe enhance your skiving skills to learn and apply this skill like a piece of cake. In this article, I will share the step-by-step process of skiving by hand useful for beginners. Learning this skill in leatherworking will help you create and design more advanced leather projects.
The Art of Skiving: Why and When To Skive

Skiving involves thinning a leather edge so that you can join two pieces that will have the same thickness as other parts. This process is necessary for joining two pieces of leather without a loop. Skiving or thinning leather is therefore essential in different ways in various leather products.
Types of Skiving: Your Options For Your Skiving Works

Skiving happens when a crafter wants to remove some leather surface layer based upon the leather item’s designs. In different leather projects, various skiving is applied. A raw edge skive is classified into two; the open raw edge is mainly used in heavy leathers in removing loose fibers from the edges, while the closed raw edge is used in eliminating uncomfortable loops in the edges in the closed seams.
A folding skive is used when removing bulk from the leather to return to its thickness even after folding. This method is further classified by four namely the hollow folding skive (used in heavy leathers), shallow/wedge fold skive (for thin and soft leathers), fold skive for bagged/ roll top edge (offered a smooth topline without stitches) and fold skive for blind/ invisible seam (use in folding leather without the stitches showing). An underlay skive refers to the thinning of the top and bottom leather before it will be stitched together to avoid uncomfortable loops and bulk.
The Perfect Time to Skive
You should skive when your leather projects require folding, bending, and joining two pieces—Skive leather before sewing and stitching and before gluing the leather pieces together. Skive the leather before putting in some accessories, and of course, this should only be done if needed in your projects.
The Reason for Skiving
Skiving helps you fold and bend leather easily. Aside from shaping the leather smoothly, skiving promotes an even surface of the leather project. The skived leather helps you stitch smoothly, for it will prevent the sewing needles from breaking, mainly when stitching thick leather.
This process removes the leather’s smooth surface grain side, making it stronger once glued together. Skiving helps in crafting, for it helps out leather to fit in designing like making shoe lust. Also, it aids in creating designs so that when accessories are attached, leather will not make a loop.
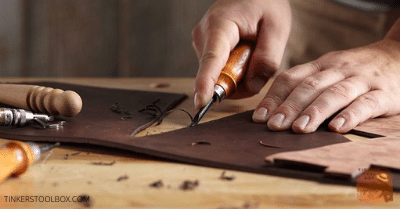
Doing Manual Leather Skiving Like A Pro
Leather skiving may be difficult, especially manual skiving, but it will be a piece of cake with the right tool and the proper procedure. Make sure to follow through, and you will skive perfectly.
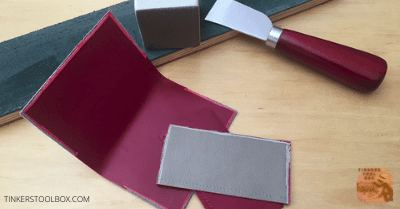
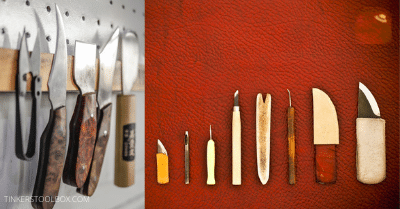
Start Right By Being Prepared With The Right Tools
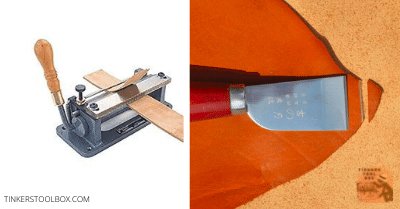
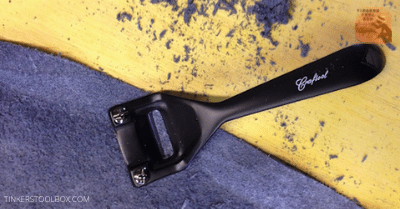
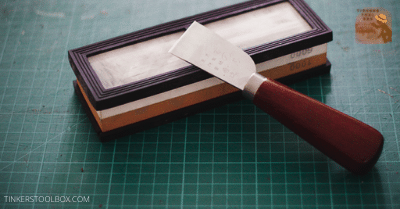
Skiving can be done through the use of skiving machines or leather skiving knives. If you are looking for a cheaper option, a skiving knife is your choice. These are used manually, which is easy to use and master even for beginners.
In most cases, we can find skiving tools at home like a knife. However, skiving is not easy; thereby, knowing the ideal tools are essential to start with. These tools can be purchased in different leather stores, which will help your leather skiving easier and better.
A skiving knife blade or an extra blade is added in leather skiving so that the crafter can easily change the unsharpened and worn-out blade. A sharpening stone is essential when skiving a leather. This is because a dull knife will affect the entire skiving process, but by using this honing tool, the crafter can ensure that the skiving knife is razor-sharp.
A leather thickness gauge is an essential tool that measures the leather’s thickness in an inch or millimeters before and after skiving. Having this skiving tool will guide you to the accurate level of your skiving.
Next is oil or a lubricant used when honing or sharpening knives, and it also prevents the metal surface of the tool from rusting. A working stone like granite or marble is an essential tool in skiving manually, for it is where leather is placed.
Prepare also the tools involves sharpening or honing and stropping before using them to skive smoothly with accuracy. Besides, most newly purchased skiving knives are not yet sharpened hence honing and stropping is another vital skill as a leather crafter.
Get ready with the other skiver and super skiver just in case you need this. Do not forget to prepare the sharpening stone too.
Doing Manual Skiving Accurately
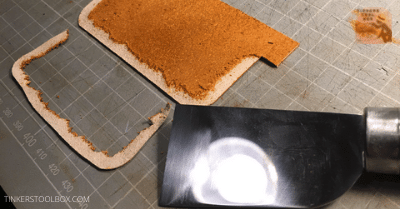
The following is the step-by-step process of skiving the leather manually. These steps must be followed strictly while observing precautionary measures. Through these steps, you can skive your leather accurately. First, lay the leather on the granite or marble slab at about 1.5 inches thick.
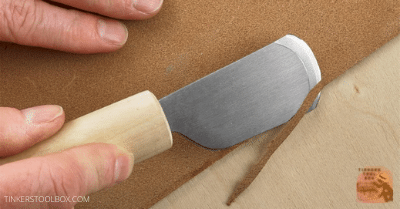
Flatten the leather, and make sure to lay down the grain and suede side on top. Position the knife to the piece of leather to be removed. Extend the tip of the blade where it will touch the granite slab.
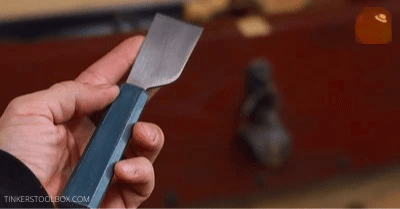
If you want a wider skive, position the knife at a low angle. For the medium skive, place the knife at a medium angle. As for the narrower skive, set the blade at a high angle. Now start slicing the piece of leather you want to remove by holding the knife with your right or left hand as control the angle and the depth of cut you will make.
The right hand (depends on your preferences if you are left-handed) will be the one to control the angle of the knife and the depth of cut you are going. The left hand, particularly your index finger, will push the blade carefully while the rest of the fingers hold the leather in place. Continue the process carefully with consistent cuts and movements.
Enjoy Manual Leather Thinning: Exploring Other Common Skiving Tools
There may be a time that your typical skiving knife cannot do the job you want. If this happens, you have other options to achieve the thickness you desire. Knowing some tips on using these tools will help beginners to slice and cut like a pro.
How To Skive Thin and Soft leather With A Skiving Blade

Start by laying the soft leather on the granite slab. Position the knife to the leather (turn the blade making the handle horizontal to you so that slices/ cuts are made away from your body). Now hold the leather taut with the other hand.
Create a small incision with the knife. Now move the blade under the leather. Make sure to move the blade away from your body. By this, it will now create a horizontal incision in the leather. Now return the knife to the first cut you have made on the piece of the leather. Repeat the process until the desire for the thinned leather is achieved.
Tips in Skiving With A Knife
Always make sure that the knife is razor-sharp. Make sure to skive on a hard and thick surface like granite, marble, etc., so that leather will not keep moving during slicing and skiving. Steady the pressure in the index finger as it pushes the knife slowly.
Always hold the knife at a steady angle (low, medium, narrow). Ensure that the edge of the knife and cutter of the leather is parallel in position, and even pressure must be applied. Remember to push the blade smoothly constantly.
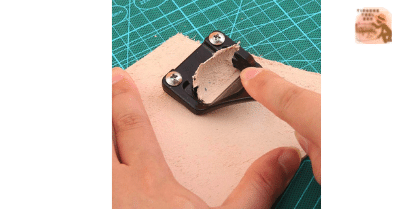
How To Skive Thin and Soft leather With A Super Skiver
Lay the soft leather on the granite slab and hold and place the other hand’s thumb above the super skiver. Position at an angle the super skiver down to skive the leather surface.
Now pull the super skiver back carefully while the thumb of the non-skiving hand holds it in place. Then move your non-skiving hand thumb down the leather. Repeat the process until your desired thinned leather is achieved
Tips In Skiving With A Skiver
You can skive with both of your hands while the other fingers hold the leather in place because the skiver is not heavy. You can take the skiver out from the leather (if it has skived deeply, making it too stuck in place) and slice in another direction.
You can also pull the skiver (if it has skived deeply, making it too stuck in place) but keep on pulling upward as you continue to skive the leather. Always angle your skiver when skiving leather edges.
“No Sweat” Skiving: The Ease of Using A Leather Skiving Machine

Using a machine compared to a manual process is undoubtedly easy and faster. If you do not have the luxury of time to slowly shave off the excess leather, you can always use a skiving machine.
What You Need For Machine Skiving

A skiving machine is used in various leather companies. This leather skiving machine is a device to reduce the leather’s outer edges’ thickness. It’s another option for shaving leather quickly aside from manual skiving.
It’s a beneficial tool not only because it makes your leather less bulky, neater, or professional looking but also speeds up the skiving operation quickly and perfectly accurately. A skiving machine is intended for an easier and faster skiving operation.
A dressing tool is used to clean the sharpening stone of the leather skiving machine to perform its primary function of honing razor sharp.
Emery stone stick is used to sharpen the edge of the bell knife of the leather skiving machine. In a way that its stick is placed inside the device as the smoothening process is ongoing.
Lastly, a hand brush is similar to the standard brush you can find at home, and it is used to remove debris from skiving.
How To Skive Using A Machine

Skiving with a machine is a lot easier than manual skiving. This machine is not complicated, but you need to set it up to get a good workflow and output.
A skiving machine’s essential parts are a bell knife and a grinding stone to sharpen the blade. Before you start using the machine, turn it on. Make sure to check its power supply.
If you set your machine right, you just have to sharpen it once in a while. You can also use a hand stone. There is a guide on how thick and how far from the edge you want to thin out in a machine. You just have to set, and you are good to go.
However, most of these are preset when you buy a machine, but it will help you even more if you know how to do it yourself. Remember, when using a machine, you have to test it out first in scrap leather (should be the same as the actual leather type you will use) to check if what you set is what you desire to get.
Once you skive, you cannot undo if there are mistakes. You can control the speed of skiving using a control maneuvered by foot. When using a skiving machine, you can get the job done efficiently.
After skiving, clean the machine, especially the leather pieces that may be stuck in the machine using tweezers or forceps.
Leather Crafter’s Mantra: Always Keep the Best State of Your Blades
Of course, to get a leather skiving job done perfectly, keeping your tools’ best state is essential. You should do this before and after you skive.
Test The Knife Safely
Before starting with any process that involves blades, the sharpness should always be checked. In the case of skiving, this is very important to achieve the right thickness.
You can test the blades if it is razor-sharp by shaving your forearm hair lightly. If the hair only bends and is not cut, then it is not sharp enough. Be cautious in doing this; it may be dangerous if you are not confident trying this out.
If hesitating, you can use a feathered edge of the leather to try out the blades. Most importantly, always have a first aid kit at hand.
Sharpen The Knife Properly

Place the sharpening stone on the working table. The sharpening stone must possess high and low grit. Use oil or any lubricants as you sharpen the blade.
Remember to follow the general rule of keeping the knife at 15°angle in sharpening (front and backside) and stropping.
Start by sharpening the skiving knife’s front side in the coarser or the sharpening stone’s low grit. Now rotate the blade knife in a clockwise motion yet in small circles. Then move the blade knife slowly in the opposite direction of the sharpening stone.
Roll slowly to the right or left point of the blade (depends on your preferences) such that the edges of the knife touch the sharpening stone. Continue the process until the burr is created. Burr is the thinnest part of the edge that will fall out as the honing is ongoing. The burr indicates the side of the knife is already sharp.
Follow the same steps in sharpening the blade’s front left side but rotate the blade knife counterclockwise. Notice the burr and roll them over to not be ground when honing with the blade’s other side.
Now sharpen the backside of the knife by following the motion. Always pull away from the blade as it touches the sharpening stone. Repeat this kind of motion about 20 times or until you can no longer find a burr. Then, sharpen the blade knife’s front and backside in the high grit of the sharpening stone.
Repeat the steps used in honing the blade on the coarse side of the sharpening stone. This time, you will not form the edge of the blade but tune it finely. Strop the skiving knife by using a stropping paddler.
Rub the jeweler’s rouge into the stopping paddler. Strop the knife by pulling downward. Repeat this motion of pulling the knife away from the edge to hit all sides and edges of the knives. Now your knife is ready for skiving or for keeping for the next skiving job.
Conclusion
Skiving serves several purposes in leather crafting, not just for assembling parts but also for your design. The key to accurately skiving the leather is making sure to have well-maintained skiving blades. The steps, techniques, and tips in skiving will help you accomplish another leather crafting task while making sure to take precautionary measures so that you can proceed to other activities in leather projects without worries.