Wearing leather jackets, shoes, or any other clothing article is excellent enough, but having unique designs all over it is a different story. You might think it is hard to do since leather is a sensitive material, but yes, you can carve designs on your leather goods using your hand and several valuable tools. Now you are interested in finding out how this works. This article is definitely for you.
How do you hand tool leather? Prepare the tooling leather, case it, then carefully transfer the design onto the surface, then tracing the strategies using a swivel knife, emboss the parts needed to be embossed, then stamping to add details weighing your leather down after.
This article discusses everything you need to know about hand-tooling leather. I will be discussing the detailed step-by-step instructions on how to hand-tool your leather. I will also talk about the tools one must use in hand tooling. I will also talk about the differences and similarities between hand-tooled leather and embossed leather. I will also be giving you some tips and tricks on hand tooling in general and some designs you might be interested in trying out soon.
- Hand Tooling Leather: The Things You Need To Know
- Step-By-Step Instructions On How To Hand Tool Leather
- Best Tools To Use In Hand Tooling Leather
- Tooled Leather vs. Embossed Leather: Compare And Contrast
- Designs You Can Use For Hand Tooling Leather
- Advantages, Disadvantages, And Caring For Tooling Leather
Hand Tooling Leather: The Things You Need To Know

Here are the things you need to know about hand-tooling leather, including the type of leather you have to use for this process.
Tooling Is Carving Something Onto Leather
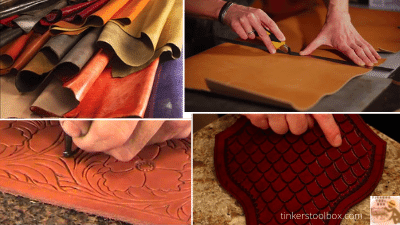
Tooling is the process of cutting into the leather to create shapes and designs. Other leather crafting processes are also combined in doing this, such as leather stamping. In other words, tooling leather is carving into the leather using your hand. Even though almost any leather can be tooled, tooling leather is the best choice for this project as it yields the best results.
Tooling Leather: The One Meant For The Task
Tooling leather could be any type of leather which is used for tooling, but is most usually vegetable tanned leather. The vegetable tanning process softens the leather and makes it more feasible to work with.
After the tanning process, it turns pale brown or white, so the leather can be dyed to the desired color. Other types of leather besides vegetable tanned can also be used, such as bridle and rawhide, but generally the result will not be as nearly as good.
It comes in various thicknesses, so the leatherworker can select the best one for each project. For example, a belt requires thicker leather than let’s say, a leather envelope.
Preparing Tooling Leather For Hand Tooling
Your tooling leather must be soft enough to be cut and impressed with stamps and tools, but not too flexible or bouncy enough that the stamp impression is erased. It must be moistened with water before it can be worked. This process is known as casing, and this is very much needed in order to stamp and shape it.
Casing your tooling leather makes the fibers swell and soften. To do that, the tooling leather is moistened by rubbing a damp sponge on the flesh side, and then on the grain side. You must apply water as evenly as possible, to prevent one side becoming soggy or too much watered compared to the other.
You can only work on the leather if it is moist, but not too wet or it becomes soggy. When the leather starts to return to its original color after being wet, the tooling process is done. It has to be moistened again if the tooling is not completed while the leather is wet.
Step-By-Step Instructions On How To Hand Tool Leather
Hand tooling leather is surprisingly easy and you might have lots of fun learning and mastering the art of decorating your leather pieces once you get to know more about hand tooling. Here are the steps on how to hand tool leather.
Choose And Buy The Right Kind Of Leather
Even though you can do hand tooling on any kind of leather, it is best that you know which ones to use so that you will not waste lots of time trying to make it work on a kind of leather that will not give you your desired results.
You must find a good place to buy leather. Common places to buy include Tandy Leather Factory and Springfield Leather Company. Physical stores in your locality are also good options on where to buy your tooling leather and online retailers offer good choices too.
Choose which one works well for you and do not be afraid of looking at other places if your resident shops do not have that one kind of leather you want for your project.For tooling, make sure you have the right kind of leather. Tooling can be done with cow leather that has been vegetable tanned.
One helpful tip: avoid leather that is intended for furniture and textured leather as they are not suitable for tooling. Choose the best thickness for your project. Start by using three to four ounces and then use thicker leather depending on your purposes. Do not use two to three ounces as these are too thin for tooling. You will just waste it.
Printing The Desired Pattern For Your Project
This is the most affordable way to get your pattern. Simply print your pattern on standard printer paper at home. You can even use wax paper or tracing paper to trace the design. Never use carbon paper or worse, draw the design directly onto the leather.
There are a lot of available patterns online but you can always create your own pattern. After all, it is your project and you can do whatever you want to it.
Cutting Out Your Leather Piece
Cut the leather to its desired size and shape. Do not use scissors to cut this type of leather as it might damage your tooling leather. For this one, you can use a box cutter or an X-acto knife instead to cut the leather piece as cleanly as possible. Cut the leather as carefully as possible then set it aside. Take care of the hems later.
Casing Your Leather Piece (AKA Getting It Wet)
For casing, water is perfectly okay but a casing solution which you can buy from leather stores and online sellers will help protect your leather from water stains. Apply water or the casing solution over the surface area you will be working with using a sponge or a spray bottle.
Apply the liquid in moderation and never soak or over-wet the leather as it damages the leather itself. Wrap the leather in plastic wrap and place it in the fridge if you need to take a break. This step is helpful because you do not want to cast a single area more than once.
Tracing Your Design Onto The Leather
After casing it, wait until the leather piece starts to turn back to its original color and then start tracing your design. Simply align your pattern, then use a dull pencil or a modeling stylus to trace over the design on the paper. Do not press hard or you will accidentally damage your leather surface.
Lift up the paper and then you will see that the casing allows the light pressure from your modeling stylus or pencil to transfer the design temporarily onto the leather. This will serve as your pattern for tooling your leather later on.
Cutting Your Main Lines Into The Leather
Next is to cut your main lines into the leather. Use a swivel knife to do this. Placing your pointer finger in the saddle and your thumb and middle finger on the barrel, keep the swivel knife like a pen you are clicking down the end of.
Place the back corner of the blade into the leather while keeping it straight up and down. Pull the blade towards you, then keep your wrist straight and turn it as necessary, by moving your fingers on the barrel.
To stop strains, the blade should always be drawn towards you. Change your leather accordingly. To build various looks, adjust the pace, pressure, and length of the stroke. For example, a whisker effect can be achieved with a fast, short pull.
Think About Areas You Want To Be Raised Or Lowered
Decide which areas you will need to be raised or lowered. Consider which areas will need shading or texture. It is very important that you plan this out ahead of time, so that you can map it on your final sketch. This will help you achieve a professional final look in your tooling.
Beveling Or Embossing The Edges
To make the pattern look elevated or embedded, use a modeling spoon to push down the edges on one side or the other. Stay consistent in which areas get raised or lowered to maintain the overall professional look on your project. Use the proper tools so that it will not create any unnecessary marks or damage on your leather. Doing this will ensure the best quality for your leather tooling project.
Stamping To Add Shading, Texture, Or Designs
Place a stamping tool against your leather in such a way that it stands vertically but sits horizontally on the surface. To imprint the pattern, tap or double-tap the mallet vertically against the top of the leather weapon. Start by using a scrap piece of leather until you determine how much pressure you must exert. That way, you will not damage your leather by accidentally adding too much pressure on it than needed.
Weighing Your Leather Down
Tooling will make the leather warp, especially if you are working on large areas of leather. To prevent it from happening, weigh the piece down when you are done so that it dries in the appropriate shape. Do not use tools that are too heavy and be careful of placing anything textured onto the wet leather. Doing so would damage your leather by adding the texture it has over the surface, ruining your design.
Beveling The Edges Of Your Leather
Break the square off the edge of your leather with a bevel tool. Doing this will keep the edges from rolling up over time. You should only bevel one side of the leather as the back side can remain flat. You have to pay special attention to any sharp corners on your piece. You must bevel them separately to create a diagonal or cut corner.
Add The Finishing Touches For Your Pieces
You can add whatever finishing touches you want to have on your leather, whichever is appropriate. A resist may be used to keep a specific area free of the finish or to reduce the coloring. When working with dyes or finishes, always wear gloves to avoid discoloration and discomfort from the chemicals.
Tandy sells finishes in a variety of colors, all of them having excellent qualities. To apply, use a paper towel, wool dauber, or a natural or very old sponge. Do not use regular sponges as they contain a chemical that does not react well with the leather.
Dyes can also be used as there are dyes intended for leather. You can also use shoe polish, and these can still give off quality outputs.
Painting also works, if you prefer to have your leather painted. You can use acrylic paint thinned with water. Apply it with a standard paintbrush. Smaller, more specific parts benefit from this approach.
Smoothing The Edges Of Your Leather
After dyeing it, smooth the beveled edges of your piece. You can do this with the aid of a special tool, but rubbing it with a paper towel or canvas cloth is a cheaper option. Doing this makes the edges look shiny and professional.
Punching Holes On Your Leather For Stitching
If you are planning on stitching your leather piece, add a stitching groove to keep your stitches from being worn down over time. After cutting a channel in your leather for the stitching, lightly mark where your individual stitches will go with a pricking iron or overstitch wheel. This will help you achieve a more polished, professional appearance. Lastly, punch the individual holes you marked using a piercing awl.
Final Finishing Touches For Your Piece
Add your snaps or whatever you want to add on your piece using a different set of tools to do this task. After doing that, rub the whole surface with a cloth to get a nice, polished, and smooth final look. After you have finished stitching, apply a plain final finish. This is not really much needed, so you can just skip this step.
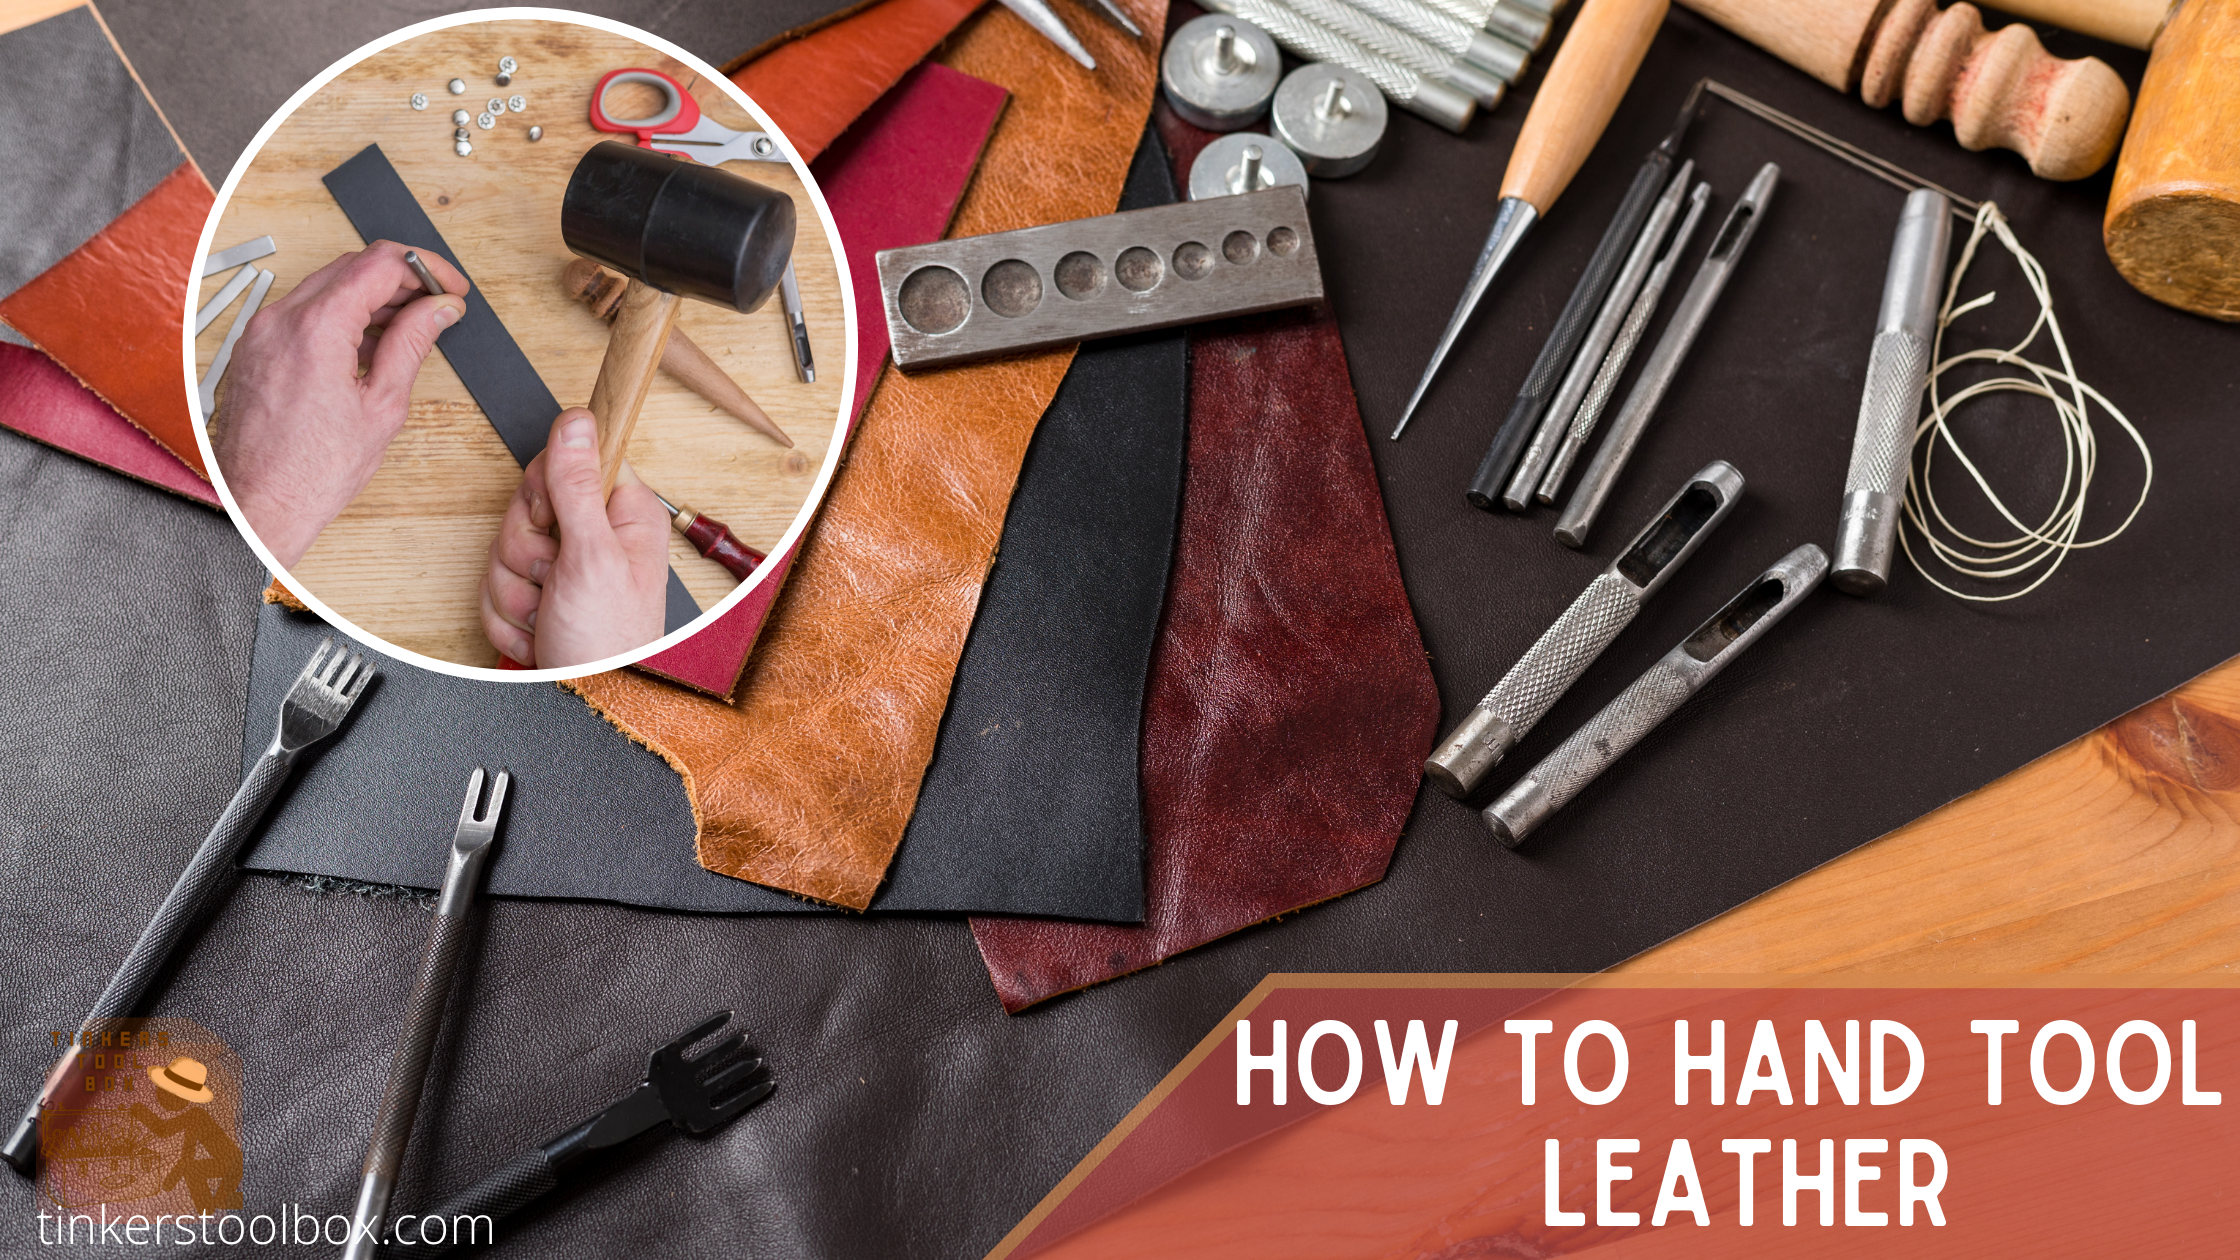
Best Tools To Use In Hand Tooling Leather
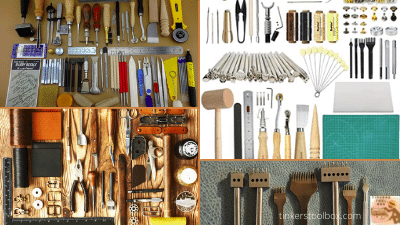
One thing that you have to remember is that tools in hand-tooling your leather are different from general leatherworking tools. You must do your research first before buying anything expensive or professional-looking.
Invest In Buying A Starter Tool Set
As you are just starting in the amazing art of hand tooling leather, there is absolutely no reason for you to go straight into buying the most expensive, professional looking tools for tooling.
It is best to start off using a beginner’s set because everyone tools in a different manner and what works for someone else may not be the same to you. Tandy, both online and locally, sells nice starter sets at very reasonable prices. Using cheaper tool sets are much better since you are just getting a feel on it.
Consider some modeling tools as well. Modeling tools, while technically are designed for clay, can really come in handy for leather crafting as well. Tools such as the stylus are commonly used, as are tools like a modeling spoon.
Get A Sturdy, Durable Cutting Board
It is a mortal sin in the art of leatherworking to cut your leather on scrap wood or any textured surface.
You should never do those, and you should never cut on a surface you want to preserve, especially your family dinner table or that expensive marble counter you have in your kitchen. The texture would make the leather more difficult to cut, and the texture can be transferred to the leather as well.
You can purchase a board or just ask a local granite supply company for scraps for free or a cheaper price. They would be very happy to give some to you. Put a rubber mat underneath as it can dim some of the sound and keep your board in place.
Focus On The Most Important Tools
Get a mallet that you will use in tooling in general. Use a poly mallet when you start working with leather.
Never use a metal mallet and please avoid any wood mallets as they are very delicate. Do not even attempt to use a hammer as a substitute if you do not have a mallet. It would just ruin your leather. Rawhide mallets are good but they are also expensive as well, so you might want to wait until later when you get the full feel of leatherworking.
Focus on buying the most basic and most useful tools as well. You should buy a stylus, a swivel knife, a modeling spoon, a beveler, a mallet, and a few basic stamps that will get you through learning the craft.
Remember that tools come in a wide array of sizes and the standard sizes are usually for large, male hands. Getting smaller sized tools if you have smaller hands will make the tool much, much easier to use.
Understand The Lofty Language Of Leather Designs
Most of those tools may have names that are ambiguous at first, but almost all of them refer to standard cowboy leather designs and the specific purpose that those tools were designed to serve.
Learning the names of these tools can be extremely useful, particularly when it comes to interpreting online instructions and locating the tools you need.
Tooled Leather vs. Embossed Leather: Compare And Contrast

These two might look the same, but they had different journeys before they became the centerpieces of our beloved leather goods.
The Difference Comes In The Preparation
Tooled leather is done by wetting the surface of the leather, while in embossed leather, it uses technology to get an effect similar to hand-tooled leather but with minimal man labor. Generally speaking, hand-tooled leather patterns are quite sharp, and some truly artistic pieces also can show some shading with patina work and various color hues in the leather art.
Since most tooling leather is vegetable tanned, the tanning step establishes its look. Natural tannins are used in this method, from the leaves, branches, and barks of the trees and plants. This process results in colors that are exquisitely rich and deep in natural earthy tones, such as browns and beiges and vibrant warm colors such as yellow and red.
It also has a distinct sweet, woody scent, which is often associated with leather. Tooling leather is also strong, supple, and absorbs water. This refers to tooling leather bought in leather stores and not the ones you prepare manually. Ready-made tooling leather undergoes vegetable tanning that uses natural tannins.
On the other hand, in creating embossed leather, heat and pressure is used to get patterns by passing the leather through rollers. Also, embossed leather generally does not have sharp motifs.
Designs You Can Use For Hand Tooling Leather

You can do totally anything once you have the basics in hand-tooling leather, but here is some advice for you before you get carried away by the wide array of possibilities out there.
Start With The Most Basic Designs
Hand-tooling leather is a meticulous process so do not torture yourself in choosing designs that are very intricate and complicated. Intricate and complicated designs would just throw you off and intimidate you into doing tooling at all.
Start with simple floral designs that can be found all over the Internet as there are a lot of designs to choose from. Choose designs that are simple, and then progress into something harder once you get the general feel of it.
Along with other skills needed in leatherworking, you should use this as an opportunity to perfect your craft slowly and surely.
Advantages, Disadvantages, And Caring For Tooling Leather
Of course, hand-tooled leather and tooling leather have their pros and cons, as well as a set of instructions we need to follow to make them last longer in their beautiful and sophisticated state.
Tooling Leather Is Perfect For Carving
Tooling leather adds a lot of opportunities for you to make your leather look more rich and well-designed. It is great for carving designs into leather and embossing designs on the surface. Investing in high-quality tooling leather yields much superior performance, giving you sharp, clear edges that are totally well-defined. The leather is also durable and it can last for longer time, maybe decades.
Hand-Tooled Leather Can Be Expensive
The vegetable tanning process is the one to blame behind the high price tag in this kind of leather. Vegetable tanning takes time, is slow, and it also requires water to manufacture leather this way. Consistency can also be an issue as hides from different animals can vary greatly. One helpful tip is to never waste tooled leather as it is very expensive and your designs would make it more expensive.
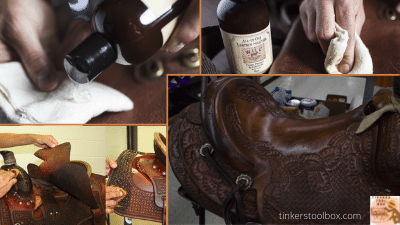
Tips On Caring For Tooled And Tooling Leather
Looking after the leather used for tooling or has already been tooled is key to having it last for many years. Caring for tooled leather generally involves preventive maintenance, dust and soil removal, conditioning, and proper storage.
Avoid getting the leather wet as tooling leather is not coated with any artificial protecting agents, unless you applied some sort of finish to make it waterproof. Always keep the leather away from heat to avoid warping and deteriorating in time. If your tooling or tooled leather gets too wet, let it dry in a cool place without heating it to avoid cracking.
If the soft leather has been saturated in oils, hard brushes may be abrasive. If you use the leather item regularly, clean it once a week to retain its consistency.
You should also apply oil or some cream conditioner directly onto the leather, working it into the grain with your fingers. Wax your leather occasionally to keep it in top condition.
Tooled leather items should be treated with a leather fabric guard as soon as possible, according to leather care experts. For its porous nature, leather can easily absorb spills, which can result in staining. Fabric guard acts as a moisture repellant shield, preventing absorption.
There is this age-old method of cleaning tooled leather which involves using saddle soap and water. While some approve of this, others claim saddle soap does not effectively clean a hundred percent, but it actually pushes soil deeper into leather pores.
Leather needs additional oiling and buffing after soaping and buffing to replace what was lost during the process. Traditional leather care items are traditionally produced to work in combination with modern leather processing techniques.
Storing Your Hand Tooled Leather Products
To retain the shape of tooled leather purses, fill the interior with tissue paper before storing them. Avoid storing tooled leather pieces in plastic; instead, as Dior and Prada do for their bags, leather manufacturers generally prefer using cloth. Porous leather needs oxygen to breathe, and if kept in an airtight jar, it will dry out and crack. Allow your leather products to breathe properly, as they still need air circulation.
Conclusion
Hand-tooling leather is simply carving shapes and designs onto your leather piece. It can be a complicated process at first glance, but once you have the basics and tools under your belt, you can do basically everything and anything. However, we must exert extra care towards hand-tooled and tooling leather as they are more sensitive than regular leather. After working, make it a habit to sanitize and disinfect your tools, cutting board, and your materials. Clean your workspace and wash your hands after resting for a while to prevent the spread of diseases, especially that the coronavirus pandemic is still raging.