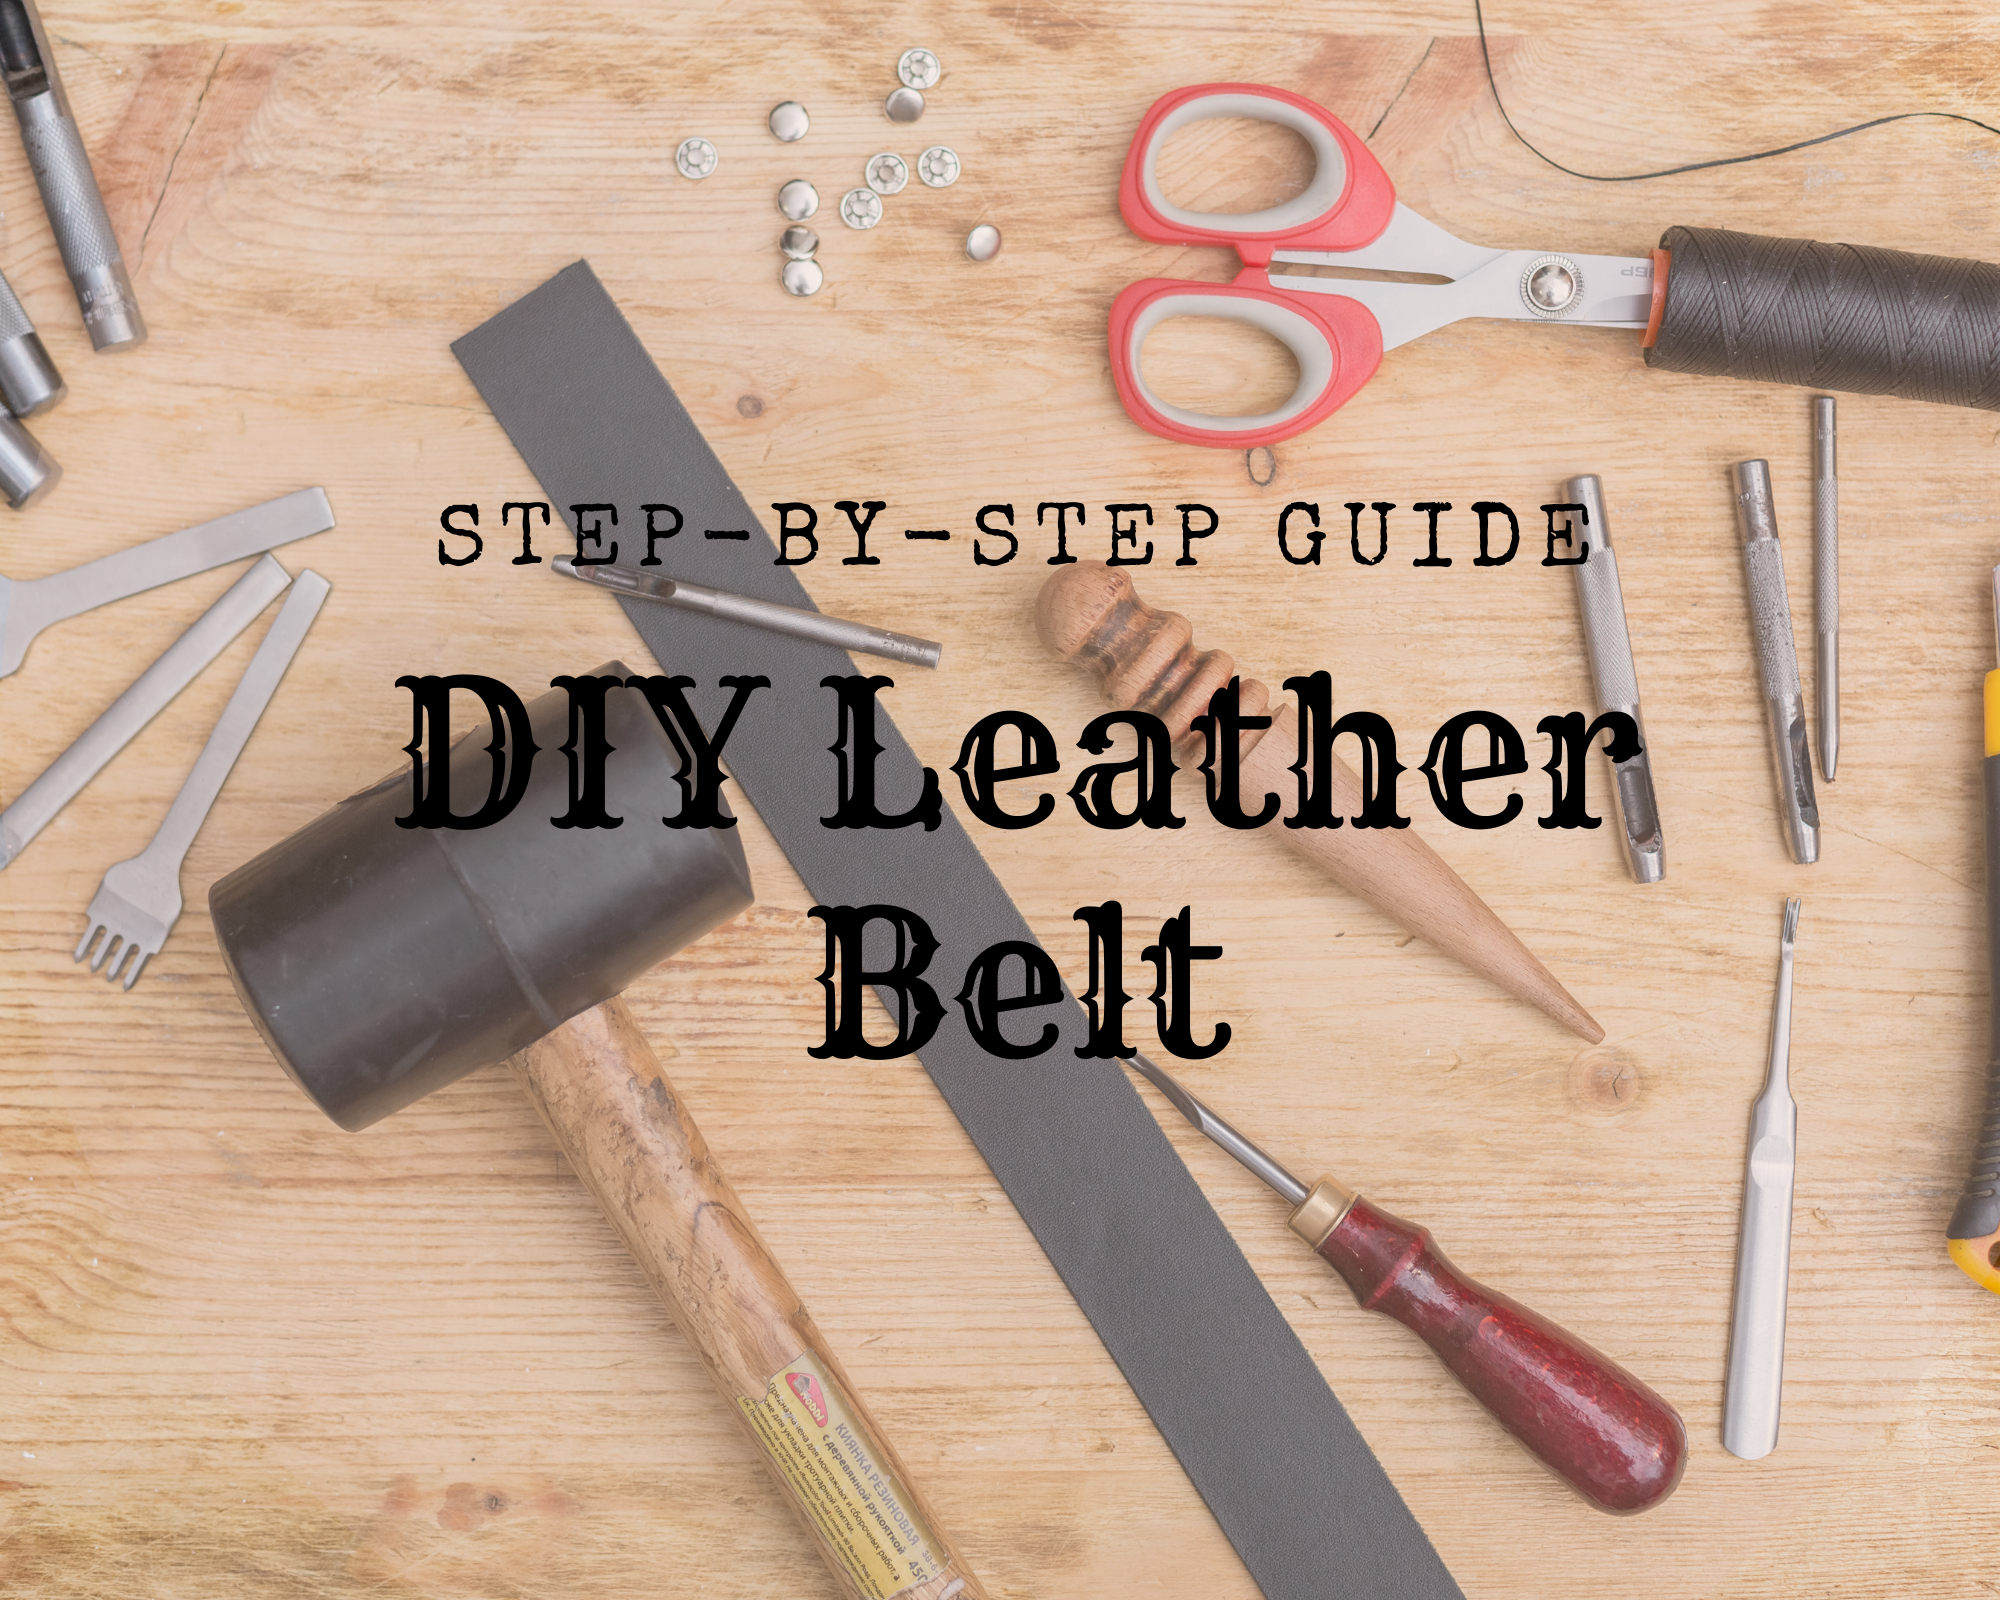
Leatherworking is one of the many exciting things we can do not only as a hobby but also as a side hustle, if we master our skills even more. They say practice makes perfect, so take the chance to improve and be better in your leatherworking skills. It might be intimidating for beginners but there are projects that are not only easy, but will also help you hone your leatherworking skills. Here are ten easy leather projects perfect for newbies, ranging from accessories, organization tools, and things you can use for storage.
What are the different easy leather projects for beginners? Some leatherworking projects for beginners include simple ones like cable ties and baggage tags, down to bigger projects such as leather journal covers, leather baskets, and letter organizers. These projects will help you hone your leatherworking skills without requiring a lot of tools or skills.
In this article, we will be discussing ten different leather projects that are easy to follow for beginners of the craft. These will only require the basic materials and leatherworking tools that you might already have in your tools holder. No need to worry about having complicated skills, either because you will just use the basic skills in leatherworking on all of these projects. Some do not even require sewing!
Here are Some Projects to Boost Your Leatherworking Skills
There might be a lot of projects available online but we have picked some that are perfect for basic leatherworking enthusiasts.
Cool Cable Ties for a Wireless Workstation
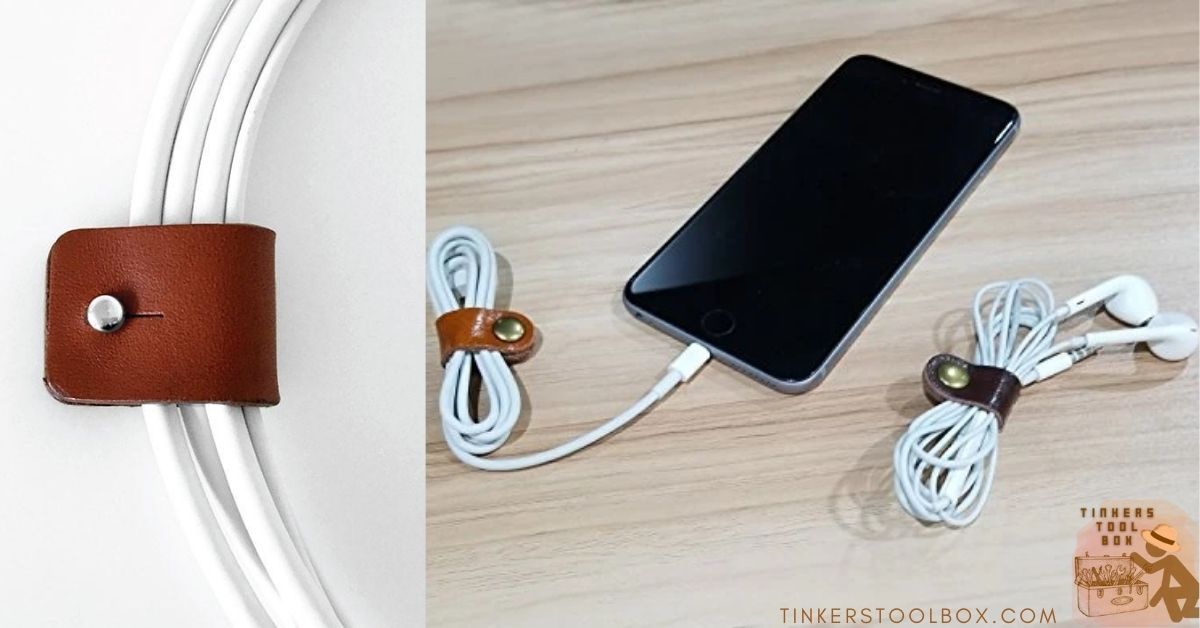
Perfect Project to Start With in Leatherworking
These can be used to bunch up wires lying on the floor, such as chargers, mouse wires, plugs, and other electronic equipment in the office or at home. Scrap leather can be used for this project, and this does not require sewing! It is recommended to use firmer leather for this project to ensure its durability.
Tools and Materials Needed for This Project:
You will be needing the following: scrap leather (firmer leather is much recommended), a stud fastener kit, and a hammer.
Step by Step Guide to Creating your Cable Wraps
Cut the leather for the cable ties. It should be at least three centimeters by eight centimeters strips. You can make it bigger or smaller, depending on your wires at home. Then, attach fasteners on both ends using the hammer. Punch it neatly, then burnish it with your fingers by pressing a bit. Enjoy! Metallic pens can be used to write your initials or any symbols for identification.
Leather Glasses Pouch to Protect Your Eyewear
Leather Pouches Make Everything Stylish
It adds a touch of glamour and sophistication when using leather pouches. It is not bulky on bags and purses, unlike mainstream plastic boxes. You can customize according to your liking, and this is another project that does not require sewing!
Tools and Materials Needed for This Project:
For this project, you will be needing the following: leather (3.5” x 17”), a marker, a ruler, a utility hole punch, a pair of button stud closures, a craft knife, and some leather glue or contact adhesive.
Step-by-Step Guide to Creating your Glasses Pouch
First, mark your leather using a marker and ruler. Mark four rows of offset dots on one end.
The first row should be with a single dot centered 0.5” from the edge. Then, put dots 0.75” from one another, with each row 0.5” apart from each other. Punch holes through the dots using a utility punch hole. Use the utility knife to carve a small slit at the very center from the hole away from the edge. These dots are for the air to pass through the pouch.
Next, punch a hole in the center, approximately an inch from the opposite edge. Put the fastener on the hole 1” from the opposite edge. Then, apply a small bead of glue at the end with the button stud closure. Apply the glue evenly, then fold where the glue ends. Press both edges together and let the glue dry completely. You can use stamps to carve letters and symbols for personalization.
Baggage Tags for Easy Identifying on Your Luggages
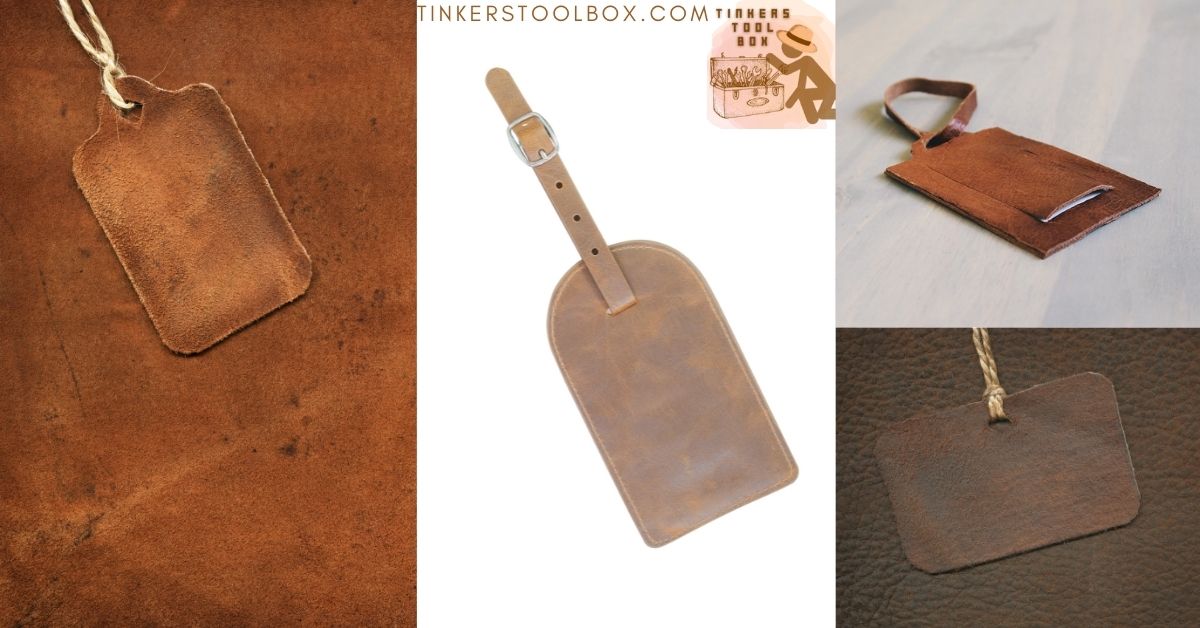
Combining Style and Environment Conservation in One
You can save the Earth by not using traditional plastic luggage tags, starting with leather tags that can make everything look expensive. It is easy to do even for beginners, and no sewing required for this project. You will need only the basic tools and some leather for this project.
Tools and Materials for This Project:
For this project, you will need the following: some leather, super glue or leather glue, a ruler, an X-acto knife, a pair of leather scissors, a sheet of vellum or transparency paper, and a sheet of thick or no bleed paper for your contact details.
Step-by-Step Guide to Creating your Luggage Tags
First, cut your leather to your desired size, leaving about half an inch extra lengthwise. Next, line the cut leather on top of each other. Trim the leather, then cut the top of one piece to make a trapezoidal eyelet.
Carefully cut three sides for folding the opening for the card in one piece. Then cut a matching rectangle within your eyelet. Cut a long, thin strap fitting within the hole. Make sure that a fairly large loop is visible when bringing both ends together.
Cut a piece of vellum fitting the cutout, then glue the edges carefully to the front piece. Be careful not to glue on the flap. Let dry, then glue the back piece to the front piece, going from one side down. Leave the top side and eyelet unglued.
Cut a piece of paper with your contact information written on it. Slide through the top side, then glue both ends of the looped strap together. Finally, tie around the bag by looping through and there you have it, your stylish baggage tag!
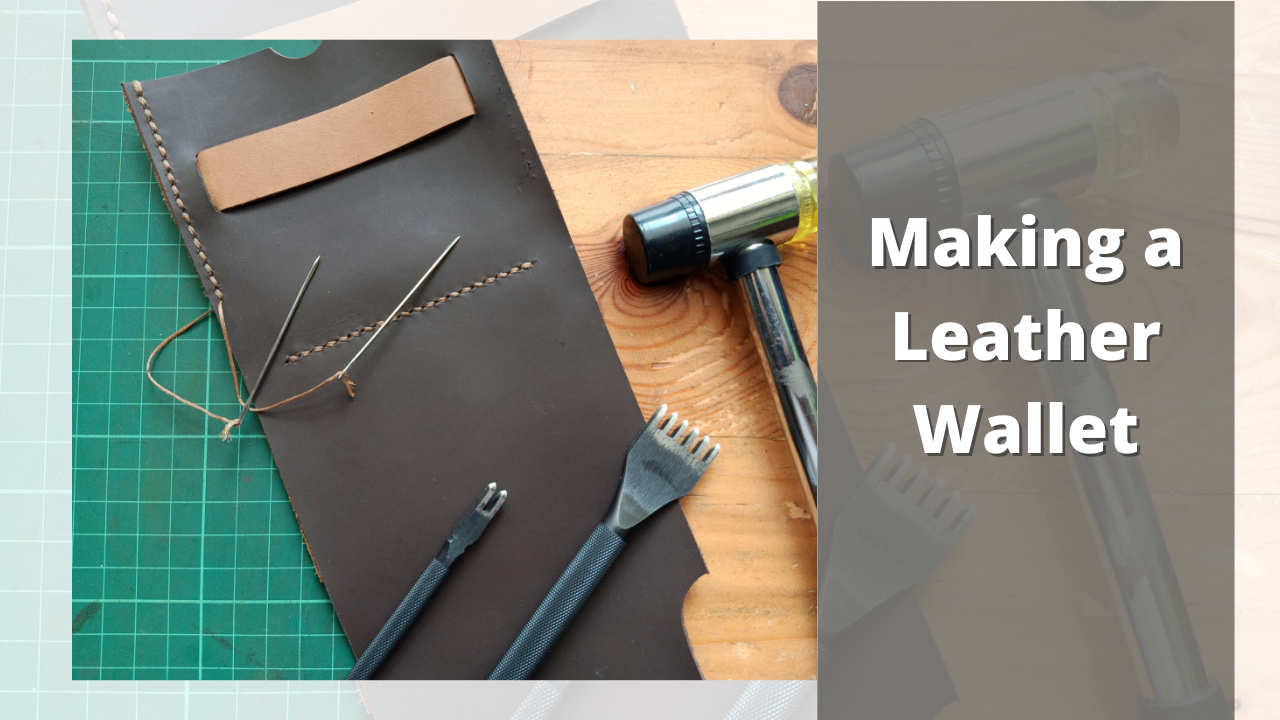
Passport Cover to Protect Your Travel Documents in Style

Dress Your Passport in Style and Protection
This requires not a lot of leather for this project, but remember that it is cheaper than buying expensive ones online. Travel in style with your leather passport cover, that you can customize to your liking, such as having more pockets for cards or receipts.
Tools and Materials for This Project:
For this project, you will be needing the following: a cutting knife, a cutting mat, a metal ruler, an overstitch wheel, a leather awl, a pair of leather needles, and some waxed thread.
Step-by-Step Guide to Creating your Passport Cover
You need to have the leather cut to these measurements: 7 ⅝” wide and 5 ½” tall. Position the edges then mark it where the flaps will lay down. Then lay the pieces separately then put contact cement to the outer edges. Leave to dry and press it together. Once the glue is dry, place the leather on the table, with the flaps facing down.
Using a ruler, measure ⅛” on each edge then run the overstitch wheel along the edge to make holes in it. Apply good pressure for precise marks! You can use a cutting mat to protect your workstation and your hand as well.
For this task, you have to use the awl to press the holes into the leather. Using an awl makes the needle pass through even better, making the stitching process much smoother. Be careful in using awls as it can still poke you! Another tip: do not use the X-acto cutter in pressing holes. Tools have specific purposes, people!
To stitch the passport cover, you have to do a crossing motion through the leather. Be careful not to stitch through the thread or it will just make the process a mess. Pull stitches tightly to make it stay longer. It is ideal for beginners to use a stitching pony to sew so that you can use both hands in stitching much better.
Once you finish stitching the cover, do a backstitch on 3 holes to secure the thread. Cut the ends carefully to avoid the thread unraveling. Flatten the stitches using the overstitch wheel.
To take care of the edges, round them with a knife or scissors. Wax the edges after. You can burnish it just by using your finger but having a wood burnisher won’t hurt you. Wipe it clean to remove dust particles, and slip your passport inside. Now you can travel in style and security.
Simple Leather Pouch to Hold Your Stuff Together
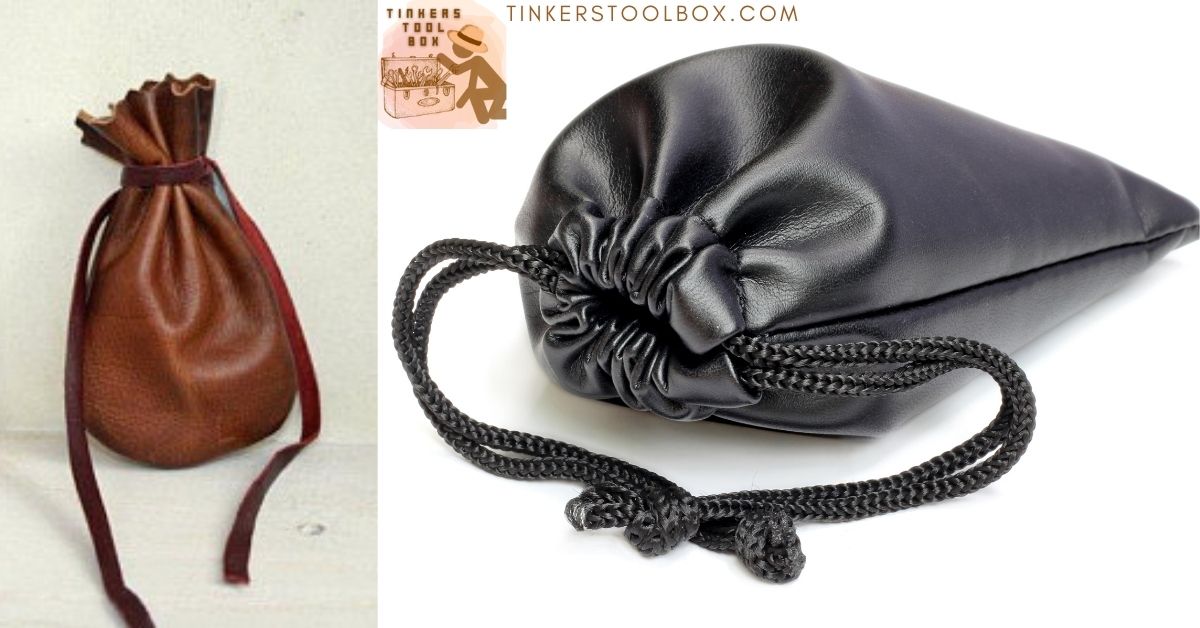
Perfect for Your Storage Needs
Making this on your own is much cheaper than buying online. This can be used as wallets or catchalls for smaller items in your bags and purses like coins, jewelry, candies. It can also be gifted to friends and family. This project is easy to do and requires simple leatherworking skills.
Tools and Materials for This Project:
You will need the following for this project: a chisel punch tool, a leathercraft nylon hammer, an adjustable groover, some waxed thread and leather needles, some upholstery leather (two pounds), and the pouch template.
Step by Step Guide to Creating your Pouch
Cut the leather to size according to the measurements in the photo. Crease along gray lines using the photo below as your guide. Then, use a groover by dragging along the leather while pushing it down to groove it. Groove on the grain side of the leather.
ext, you have to punch holes with a punch tool and nylon hammer. Smack the chisel using the nylon hammer. Then, punch all around the outside edges. Make sure holes line up evenly across both long edges.
You need to thread the needle with waxed thread. Squish the end of the thread between fingers then pass an inch through the eyes, then bring the longer piece of thread up to the end of the needle then twist open.
Lock the thread into the needle then repeat the process to twist the thread. Twisting thread makes the stitches stronger. It is advisable to put the leather in between a clamp or stitching pony so that you can use both your hands in stitching the leather together.
Push the needle into the first hole then take it in your left hand then push it through the next hole. Take the needle in your right hand then push it into the same hole. Make sure it’s behind the left thread. Always use the same hands in stitching and inserting the needle for consistency. Make sure to pull the thread tightly to keep the edges close and tight. Saddle stitch across top and bottom through a single layer of leather.
Doing this adds a little decoration to the pouch. Then, fold the bottom edge up, saddle stitch from the bottom to sew two layers together. Do the same with the top edge by folding it down, then saddle stitch. Stitch the other side of the bag through both layers to close the pouch.
You can add a snap fastener to the top and bottom flaps to close the contents shut. You can also paint a bit on the front side for design if you are good at painting or add some embellishments if needed. Remember to wipe it clean to remove the dust and other particles in it.
Leather Journal Cover for Your Notetaking Game
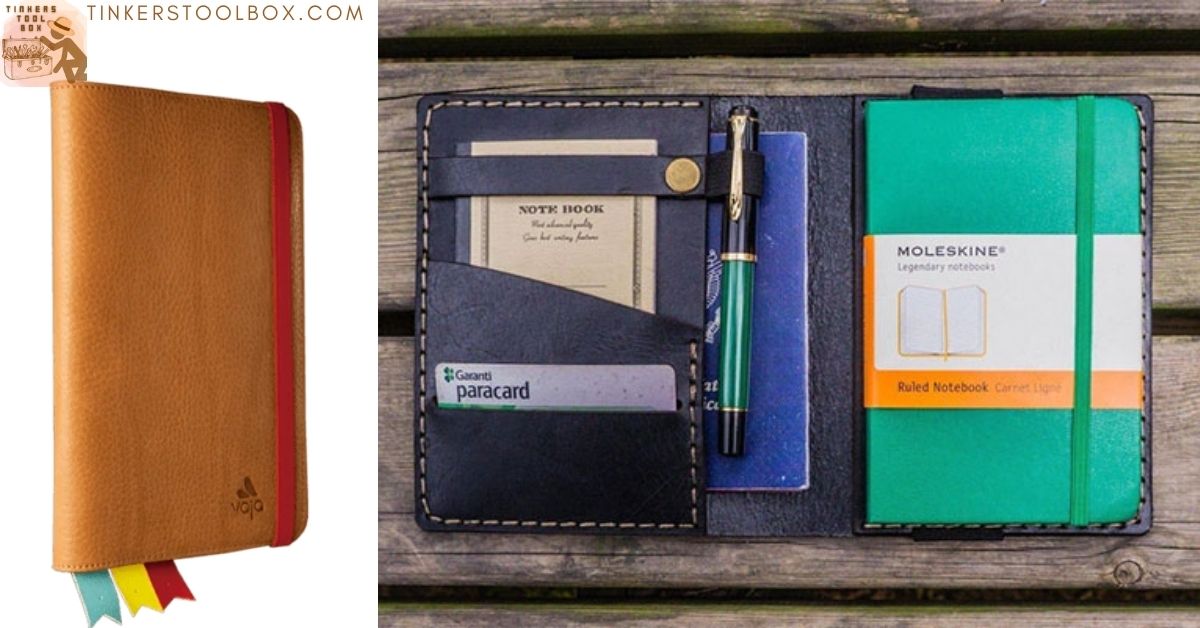
Boost Your Bullet Journal Gaming with This Stunning Cover
This project is perfect for those into bullet journaling and note-taking. This makes simple notebooks sophisticated and expensive looking. Creating covers on your own is much cheaper than buying from bookstores. It can be personalized to your liking, too!
Tools You Will Need For Your Journal Cover
For this project, you will need the following: a rotary cutter or an X-Acto knife for beginners, some leather glue, your leather (4oz recommended), some waxed thread and stitching needles, a diamond chisel, a stunning groover, Gum Tragacanth, a rivet setter and anvil, some snaps for fastening, a burnisher or piece of canvas will do, and an edge beveler.
Step by Step Guide to Creating your Journal Cover
First, you need to download the template and print it on heavy paper like cardstock for tracing. Remember: you must print it to “actual size” to avoid shrinkage. Cut out the template cleanly and more precisely, paying attention to the curves and edges. Use a straight edge or rotary cutter for straight lines, and normal scissors for rounded edges. Make sure to cut curves as clean as possible.
After cutting the template ready, place it on top of the leather. Make sure to trace the lines evenly. If you’re worried about the template skidding while cutting, you can use adhesive to secure the template (scotch tape or masking tape will do just fine). Never use duct tape or it will damage the leather and ruin your project.
Now we’re going to cut the leather for your cover. For beginners, I recommend using a rotary cutter and an X-acto knife. Lay the straight edge along the outlines, then you can start cutting the leather according to the template. Just make sure to cut the corners and edges clean to look sleeker.
Cheaper leather is recommended for beginners but they can have lots of stray fibers in it. To fix that, apply Gum Tragacanth to the backside of the leather and rub it back and forth until it gets glossy. Make sure to not rub it too hard if fibers are very large, or it will just unravel and destroy everything. If this happens, you can rub in the direction of the grain.
Now we’ll go to finish the edges. To do this, we need to sand with low grit sandpaper to even the edges out. You can bevel it too but for thinner leathers, it’s okay not to use this. Then, sand with higher grit sandpaper to remove large fibers. Dye the edges and let dry. Wet with gum Tragacanth. You can burnish with a wood burnisher or use a canvas if you don’t have the tool yet.
Lay the strap template onto the strap and mark both the beginning and end of the strap. Make only two holes for this step. Next, align the stitching groover to the stitching lines. Use the groover to create a stitching channel and drag the tool around the curve. Rotate the leather with one hand then pull down towards yourself with the other. Glue strap on the leather using gluing cement.
Set the first tooth using a two-toothed chisel in the hole earlier then hit it using the rubber hammer. Do the same thing on the last hole and line up the chisel for succeeding punches. Punch the holes clearly to avoid messy holes, then repeat until all the holes are punched out. We are halfway through the finished project now. Thread your needles for the stitching, then saddle stitch. Finish until the strap is in place.
Pro-tip: pull the thread tightly to secure stitches and prevent it from unraveling soon.
In placing the snaps, you have to create rivet holes. To do that, use the template as your guide to creating rivet holes. Hammer punches using a mallet into each hole, then hammer the rivets into place. The male side (the pointed one) on the cover, then the female side (the one with the hole) on the snap. Then, hammer the snaps closed until it gets secured.
We’re now going to make the cover clean from any excess fibers and stuff. Apply glue using a paintbrush, then check the glue if it’s glued to the edge. Make sure the edges are evened out, then cut any excesses using an X-acto cutter. Alternatively, just sandpaper the edges to even it out if the excesses are not that much.
Now, we have to create a stitching channel on the flaps using the groover once again. Punch holes in the stitching channel, then create another stitching channel for the cover. Punch the holes with the groover, then saddle stitch the covers until they come together as one.
To finish the project, you have to burnish the edges using the wood burnisher or the canvas you just used earlier, whichever is available. Wipe the cover clean of dust and other particles. Avoid getting it wet by spraying water or alcohol, and now you have a freshly-made journal cover meant for your notebooks and pads.
Stylish Leather Basket for Your Storage at Home
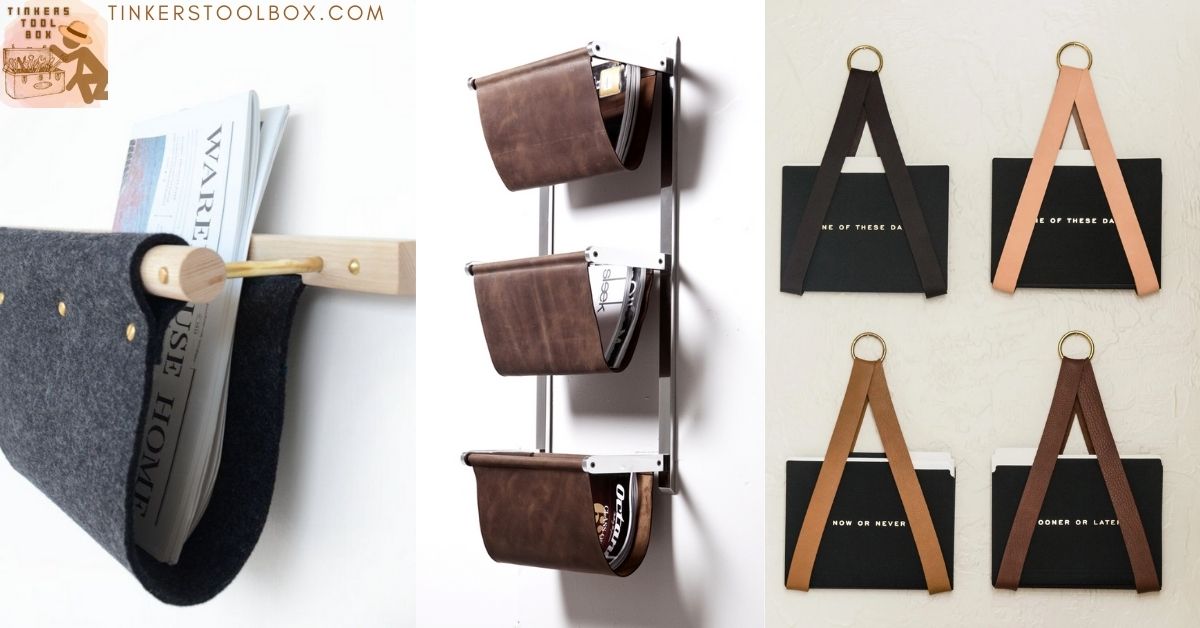
Taking Your Storage Skills Into Another Level
This project is perfect for newspapers or magazines lying around the living room. It can be used as a mails and bills holder. This is suitable for organization junkies. This project blends woodworking and leatherworking into one amazing project. It can also be a cute accent piece in your room!
Tools and Materials Needed for This Project
For this project, you will need the following: ⅝” wide hardwood dowel, a 1 x 2 hardwood board, some leather straps, some heavy waxed thread, some tacks, a saw, a drill press, a pocket screw jig, a tack hammer, a leather hole punch or awl, and a leather needle.
Step-by-Step Guide to Creating Your Leather Basket
First, you need to cut the wood pieces. Cut the 1 x 2 piece and cut a twelve inches piece and two pieces measuring six inches each. Cut the dowel piece to 12 ½ inches. Then, measure the centers and ¾” from the front end of the 6” pieces. Drill a ⅝” wide hole that is ½” deep to accept the dowel. Drill the pocket holes on the ends of the 12” back piece.
Next, cut the leather straps to 11” lengths. Then, punch four holes on one end. There should be two holes close to the end and two holes about a couple of inches in. Run the waxed thread through three to four times, then tie it towards the back with a square knot. Cut the ends after.
Next, assemble the dowel piece after sewing. Make sure to space the strips evenly. Tack to the back board, then lay the nice-side down and nail tacks to the top edge. Assemble the frame, then attach one piece using pocket screws in the pocket holes. Insert the dowel to the attached side, then screw together the other side piece.
You can attach it to the wall by drilling through the back, or just put in on top of your table or dresser.
Leather Mason Jar Sleeve to Protect Your Hands!
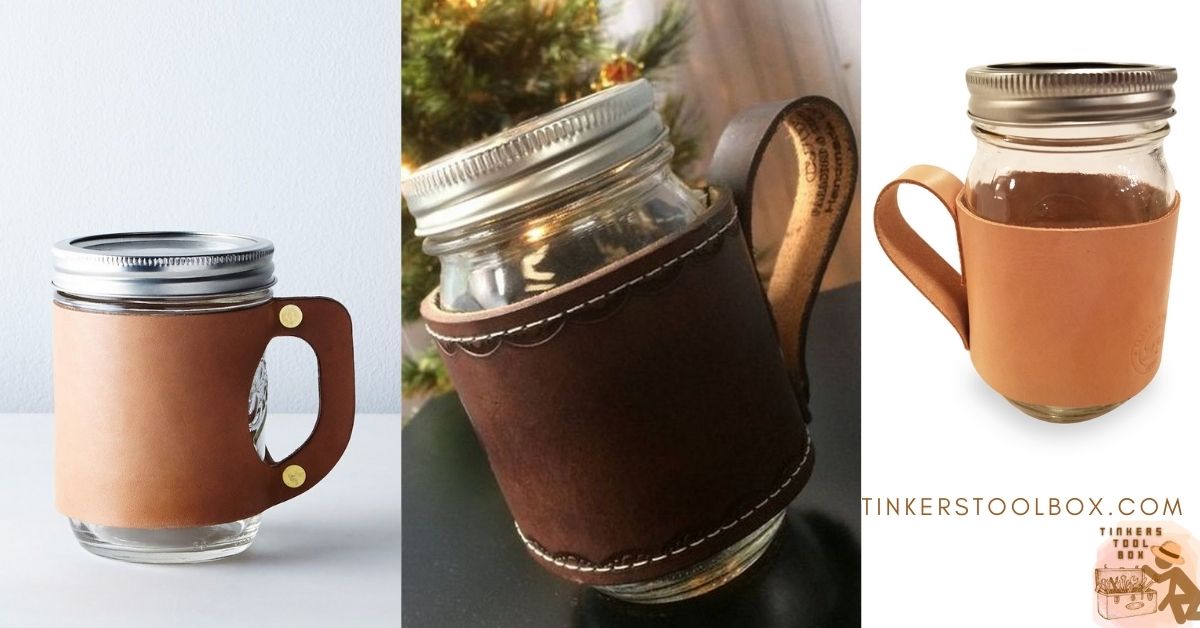
Save Your Paper Sleeves with This Leather Alternative
These jar sleeves are a perfect gift to anyone who loves leather and elegance. It makes your simple Mason jar look like a million bucks. This project does not require much leatherworking skills or specialized tools.
Tools and Materials for This Project:
For this project, you will need: a Mason jar (pint sized), some carving leather, two sets of rivets, a catgut thread, heavy needles, a leather hole punch, a hammer, a rotary cutter or a hobby knife, and a ruler.
Step-by-Step Guide to Creating Your Leather Basket
First, you need to measure your pint jar. Typical Mason jars measure 10 ¼” around, and three inches tall. Cut one piece, 3” tall and 10 ¼” wide, then cut the skinny strip ½” to ¾” wide and six inches tall.
Use a leather hole punch to punch six holes down each three inch side. The skinny strip is for the mug handle. Rivet onto the wide leather, the first one with the leather wrong side out. Flip it over and rivet the right side out at the bottom. Punch holes and press riveting studs through the backside of the leather. Press the skinny strip on top, then set a rivet cap on top.
Hammer the cap on the stud, then loop over the strip and press onto the other stud. Cap and hammer them in place. Next, thread up the side holes. Make sure to thread it tight so the leather edges touch. Zigzag it back and forth through the holes. Tie it off inside, slip it around the Mason jar, and enjoy your new Mason jar sleeve!
Letter Organizer for Your Stacks of Mail and Bills

Get Your Letters and Bills Within Reach
You can put mail or bills or receipts and lists for easy keeping. Declutter your fridge door and put your bills here! Again, another woodworking and leatherworking collaboration here but it is easy to do and does not require complicated skills.
Tools and Materials for This Project:
This project requires the following: a wood plank (1 x 8 cut down to 20”), some leather, brass nails or escutcheon pins, a ruler, a utility knife, a hammer, and a pair of pliers.
Step-by-Step Guide to Creating Your Leather Basket
First, cut the leather to size depending on the size of the plank. Attach the storage pockets to the wood. Then lay the first piece of leather face down an inch or so from the top edge. Hammer the brass nail into place at the top center. Fold the leather in half, then secure each of the top corners with nails. Repeat the same process with the other pocket. Make sure the pockets are spaced evenly. Proudly display it in your kitchen and enjoy!
Conclusion
There are a lot of projects perfect for leatherworking newbies to hone their leatherworking skills. It ranges from easy ones which requires you to perfect your cutting and sewing skills, down to the more complicated ones which allows you to master your carving and other relevant skills. These projects require the basic tools and materials, so no need to buy expensive leatherworking tools. Grab some leather and your tools holder and try some of these projects for yourself!