
I have been learning leathercraft for a long time and have improved my skills in leatherworking. Maybe you are on your way to an advanced stage of this craft and wanted to challenge your skills by creating projects that are not that easy. That is why I prepared some project ideas I did that you may want to try as your first advanced leathercraft project!
What are the advanced leathercraft projects a leatherworker can do? You may want to create molded leather projects like molded pouches, AirPods cases, and phone cases. Also, you may try working on a bifold wallet or a handmade leather journal. These projects will need skills, patience, and knowledge of your tools.
Now that you know what to create let me help you with what you’ll need for the projects. I made this guide to determine which tools you will need for each and the leather types recommended for the different projects. You may also find here provided procedures for some unusual projects. So if you are up for the challenge, let’s go and do some advanced leather projects!
Projects for Advanced Leathercrafting
Project 1 – Molded Leather AirPods Case
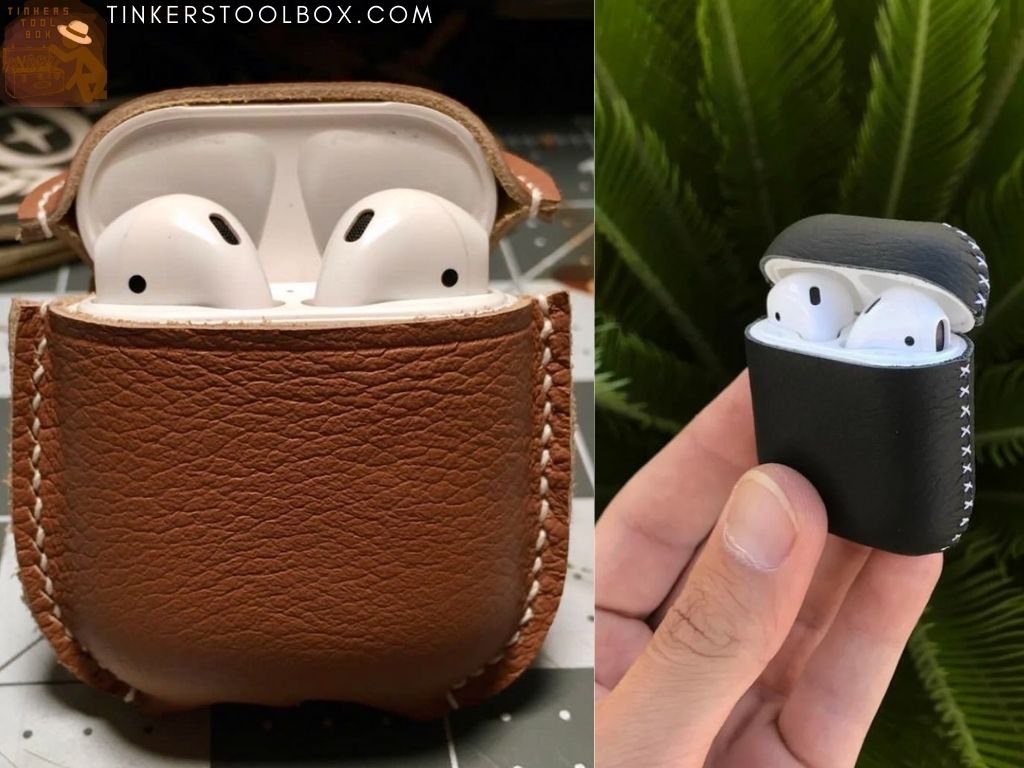
Many people are using AirPods, and there are also many AirPods cases available in the market. Let’s make a custom-designed leather AirPods case! This project is going to be a fit and fully covered protective case that opens with your AirPods.
Things You Need for your Airpods Case
Tools and Supplies
Let’s start preparing the tools you’ll need for this project. First, the tools you will be using for molding: leather clips or any clips you may find, and the mold, which is the AirPods itself covered with cling wrap. Next are the punching tools for stitching like chisels, awls, and a mallet. Last would be your cutter. You might also want to stock up some dyes, glue, thread, and needles as your supplies.
Leather Type
This project will require you to use thin leather that has a shiny and smooth front. You won’t need to have a full leather hide for this. Just full or top-grain veg-tanned leather remnants of around 1.8mm will get you through this project.
Budget
You might want to aim for scraps in making an AirPods case that will save you a couple of dollars. But if you run out of leather, stores will let you buy leather remnants for around $10 for a 2-pound pack if you want some designs and a strap for the case, a set of rivets sold for $9.
Time
If you think a small project won’t consume so much time, then you probably underestimated molding. Soaking your leather already takes 30 mins to a couple of hours, depending on the thickness. Molding the leather into the shape of your Airpods can take you overnight or until the leather fully dries up for 12 hours. So make a maximum of 24 hours time allowance.
Brief Procedures in Making a Leather Airpods Case:
Step 1 – Prepare Your Mold
This project will require a 2-part mold frame. You will be using your AirPods as the mold, along with a cardboard frame to support the molding process. The first part is the AirPods, tightly wrapped with cling wrap, avoiding moisture to seep in. The second part is the mold frame, a rounded rectangle cardboard frame with its inner rectangle that’s a millimeter larger than the size of your AirPods. This frame is a photo-frame-like cut-out pattern you can print and paste on cardboard that aids in shaping the leather into your first mold, just like how wooden mold works.
Step 2 – Wet Molding your Leather into the AirPods
Start the wet molding by soaking your leather for at least 30 mins, considering that you use the leather of 3mm or less. Now mold the leather around the wrapped AirPods by pressing gently with your fingers, making sure the AirPods are sandwiched equally in the middle. Clip the mold frame around the leather to help with the molding. Leave this overnight for 12- 24 hours or until the leather dries up.
Step 3 – Cutting Out the Parts of your Airpods Case
You can now remove the mold and start cutting the small opening for the charging port in the middle of the AirPods case. Trim the excess sides, leaving at least 3mm stitching allowance. On one piece of the case, trace where your lid opening should be placed, like it is on the AirPods. Then continue the lid opening 10mm from each side of the other half pair, leaving the center as the lid’s hinge.
Step 4 – Constructing and Finishing the Case
When you are satisfied with the structure, start punching stitching holes right on the bottom of the half pair’s molded portion. Glue the edges and prick the leather with an awl to match the stitch holes. Stitch all around the case, trim and sand the sides, and start polishing your Airpods case!
Project 2 – Leather Phone Case with Card Pocket
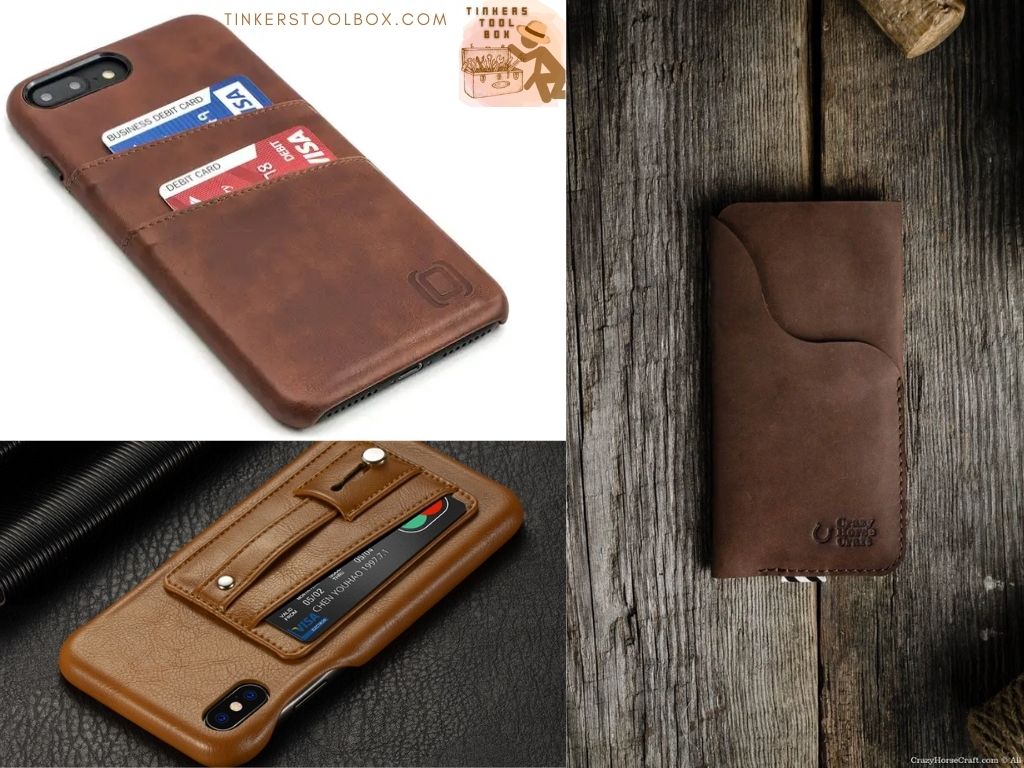
Protective leather phone cases exist, and you can make one with your design. You will only need patience in molding leather. To make things easier, I provided a list of the things you will use in making a phone case.
The Things You Should Prepare for Your Phone Case
Tools
In this project, a precision knife is a necessity. Followed by a plastic slicker and folder to mold the sides. Also, have some glue, thread, gum tragacanth, and sandpaper with you.
Leather Type
Since we will not be wet molding, a softer and thinner top-grain leather is recommended for such projects. You will use a shiny veg-tanned goatskin leather of at least 1.5 mm thickness. This type of leather is flexible for dry molding and stretching.
Budget
You won’t be using leather alone, so secure a cheap, clear hard plastic case that’s around $1-$2; we’ll be transforming that. Some options for your leather will be a goatskin leather that costs $18-$20 for a 15sqt side or a top grain leather that costs $9-$10 for a 20 sq ft side. Both are good leathers for the use of this project, but you will need only a square foot of the leather, so if scraps of these are available, use it!
Time
Unlike the AirPods case, this project won’t cost you much time. An hour or two is enough to finish molding a leather phone case. If you are curious about how to do it fast, here are some quick steps:
Making a Molded Leather Phone Case
Part 1 – The Card Pocket
Step 1 – Preparing the Leather and the Pattern
Start by loosening and stretching up the leather for your phone case. Using a separate and unstretched portion of leather, cut a card pocket pattern covering at least ¾ of a credit card, lengthwise. If you own a press for your logo, feel free to add designs to the pocket.
Step 2 – Attaching the Card Case to the Leather of the Phone Case
You can now mark and start punching on the leather for your stitches. Burnish the sides well with wax and slicker. Then, attach the pocket to the leather of your phone case by sewing.
Part 2 – The Phone Case
Step 1 – Prepping the Base of the Phone Case
The reason why you should buy a cheap case: we’ll make it rough by sanding so the leather would stick. Meanwhile, prepare your leather; if you’re not satisfied with the color, you may apply some dye to it. Now, apply glue on both the case and leather and wait for 10-15 minutes before stitching them together. Ensure your card pocket attached is on the bottom center part of the phone case, then mold and stretch the side gently slowly.
Step 2 – Molding the Leather Into the Phone Case
Round corners need patience. Aid the molding using a plastic slicker or folder to the sides until the leather perfectly fills your case. Secure the surface, ensuring there are no unnecessary pleats and loose sides. Trim the excess leather, cut open the camera hole with a knife, and polish by sanding, applying wax, and burnishing.
Project 3 – Molded Pouches
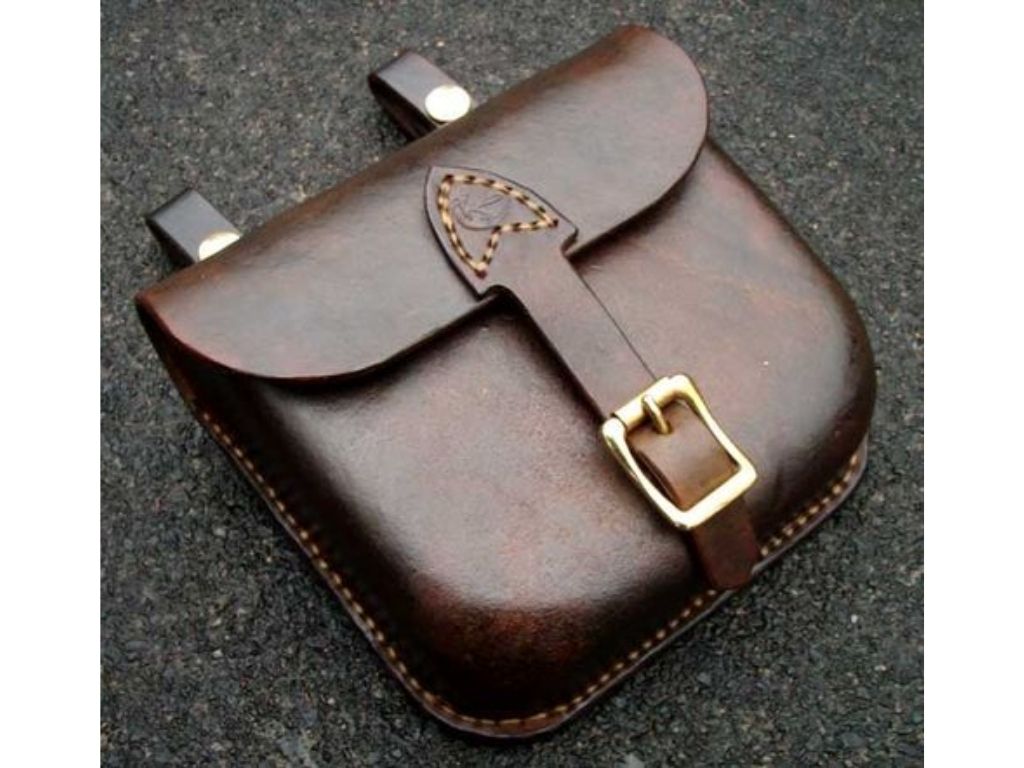
Source: Pinterest
If you are tired of boring regular pouches, let’s try molding the leather into your desired pouch shape. Making molded pouches might take a lot of your time, but I assure you, it’s worth it!
What You’ll Need to Mold a Leather Pouch:
Tools
In making a molded pouch, you’ll need to cut with a cutter or any blade you are comfortable working with. You will mold and mark with a wing divider, clamps, and a wooden mold and frame. Awls, mallets, chisels are for the punching process. Tools like slickers and burnishers and supplies like dye, coating, and beeswax are for polishing. Also, secure some accessories like buckles, locks and clasps, belt and strap loops, and press setters for this project.
Leather Type
This molded pouch sounds like a luxury project; hence you will need genuine leather like a full-grain with a Napa Finish or Top-grain leather with a 1.4mm to 2mm thickness. But, there’s a cheaper option to use as corrected grain leather, though it compromises quality. It is crucial to choose a leather that has sego oil because it makes the leather wear-resistant.
Budget
Here, I have prepared a budget according to the type of leather you prefer. A veg-tanned leather sold in 20-25 sq ft sides costs around $250- $310 or $10-$12 per sq ft. A full-grain veg-tanned vachetta calfskin leather can cost a minimum of $45 for a 15-20 sq ft side. Chrome tanned leathers cost around $8-$10 per sq ft. but is usually sold in 20-25 sq ft sides. You may also choose to use pre-molded stamps to design your pouch, and these tools may cost you $15 to $20.
Time
We already know that wet molding needs a lot of time. From soaking the leather for a minimum of 40 minutes to molding it for 4-12 hours, waiting overnight to dry up. You also need to allow time for working on the whole process of making the pouch itself for 1-2 hours minimum. Let’s just say an entire day is not too long for you to finish a pouch.
Creating Your Own Molded Pouch
Step 1 – Molding the Leather into the Shape of Your Pouch
Prepare your mold and frame, and while doing so, you can soak the leather for 40 minutes to an hour. After soaking, lay the leather into the mold and press it first using your hands before using the frame. Secure the mold by adding one clamp at a time to allow your leather to form well. Once the frame has fully closed, let the leather dry overnight or for 12 hours. A quick tip, use some weights to secure the flat top surface.
Step 2 – Assembling the Pouch
In assembling the pouch, prepare first your pattern for the back piece and add necessary pockets. Dye the leather pieces. Trim the front with a 5mm edge allowance from the molded side.
Sew the back pocket and belt strap into the back piece. Attach the back piece to the front by glue, then soon create punches. Proceed to polish the sides and add a protective coating. Lastly, stitch along the sides and attach the closures and all necessary accessories to the pouch. Excellent work with your molded pouch!
Project 4 – Bi-Fold Wallet
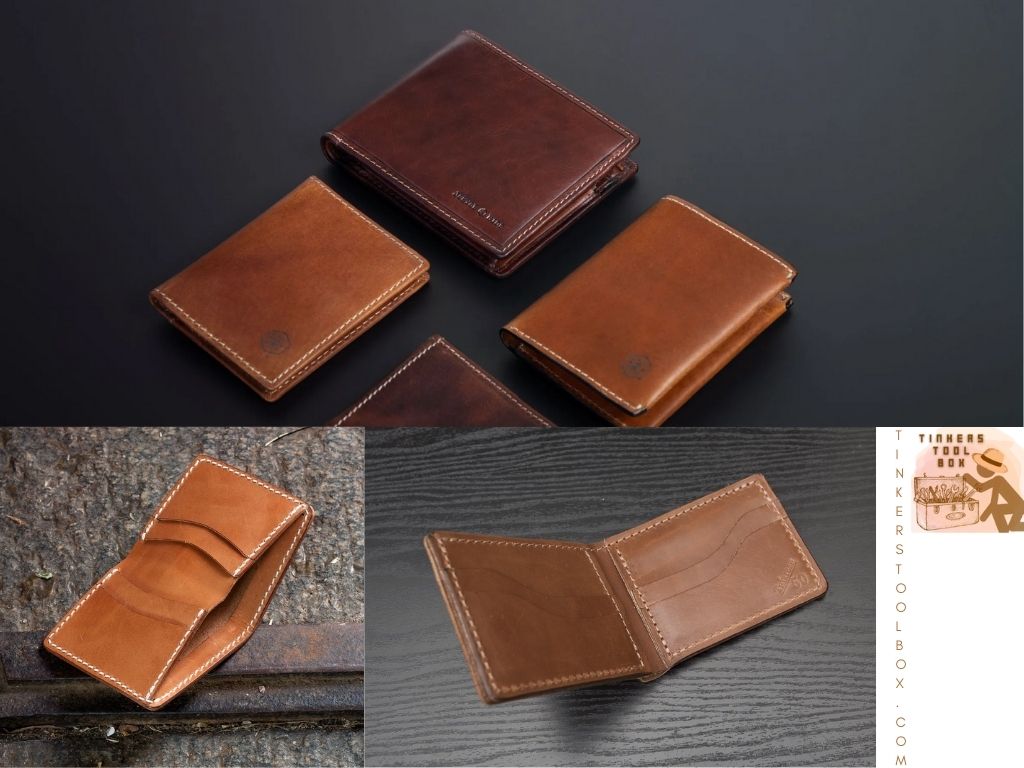
We love pockets! This bifold wallet will give you more space for your cards and bucks. Check out this list of the things you’ll need to make one, and let’s get you started with creating your wallet.
Things to Look for in Making A Bifold Wallet
Tools and supplies
This project will need a lot of cutting, and in these cuttings, you’ll use some precision or an X-Acto knife or a box cutter. Have a stitch groover with you or a wing divider to guide your lines. Ensure you have pricking irons, mallet, thread and needle, and leather glue like a contact cement to assemble these pieces.
Leather Type
A leather wallet needs to look classic and elegant so let’s choose a nice leather for this. You will use a double front, veg-tanned calfskin leather for the wallet cover. An animal printed skin could also work for a wallet cover. Then, secure a thin veg-tanned, Napa finish grain leather for the wallet lining and card pockets. Using a thin leather inside will help you not to make the wallet too bulky.
Budget
Some leather is a little pricey because most stores will only allow you to buy a whole hide for this. But there are online stores that will sell a double front leather for around $48-$50 for an 18sq ft hide. In comparison, an alligator skin, for example, might cost $125 per sq ft. Then you’ll need to spend $26-$32 for the leather you’re going to use as lining.
Time
This project is quite simple despite having to cut many parts. Making a bi-fold wallet may be done in 2-4 hours, given that you already have a pattern.
Procedures in Making a Bifold Wallet
Step 1 – Cut the template
Prepare your printed pattern and trace this template to the lining leather. Cut out the leather and arrange the pieces that go together. You will cut a separate template piece from the leather that will serve as your cover; this will be the longest piece.
Step 2 – The Pockets
When you have arranged the pieces, you will find that there are two similar sets of pockets. These sets mirror each other. Assemble the pockets first by gluing on the sides, then stitch the left fold pocket set on the right side and the right fold set on the left side. You can now attach them to the inner base with glue.
Step 3 – the Cover
Now, glue the inner base with the pockets from the corners of the cover. Since the cover is longer than the inner pockets, the center of this front part will be your folding allowance and shall not be glued.
When the glue has settled, create stitch and punch marks on the edges. Sew on the edges with a clean saddle stitch, then proceed with the rest of the polishing process. Congratulations on making your bi-fold wallet!
Project 5 – Handmade Leather Journal
We like our things protected yet easy to carry, and this project will help you achieve that. A handmade leather journal will not only cover your journal but will also provide you a pen holder, allowing you to take your pen and notebook wherever you go.
List of Tools and Materials You Need to Provide:
Tools
This project is one of the simplest, yet it requires a lot of tools. Let’s start with the knife for cutting, pricking irons, curved punches, mallet, thread, and needle to punch and stitch. You’ll also need sanding tools, edge burnishers, and beeswax for polishing. Design and logo stamps and a stamping machine press are optional tools but might be great in taking your project to the next level.
Leather Type
You will need leather with at least an approximate thickness of 0.3mm – 1mm in making a handmade leather journal. A recommended leather is chrome-tanned top-grain leather, which is not that expensive. You may also use a veg-tanned goatskin leather with a nice shine for this project.
Budget
If you are torn in choosing between those two leather types, this budget info may help you decide. A veg-tanned goatskin leather costs $18-$20 for a 4 sq ft, while a chrome-tanned top-grain leather will cost $8-$10 for a 20-25 sq ft side.
Time
This simple project may only take 1-2 hours of your time, so you can make more of this if you have a whole day to spend.
Simple Steps in Creating a Leather Journal
Step 1 -Prepare and Cut Your Leather
First, prepare your necessary materials for this project. Trace your template from your print outs, or you may create your pattern based on your journal size, then cut the leather. Make sure also to mark and cut the center cut-outs for the pen holder.
Step 2 – Assembling and Polishing your Leather Journal
After cutting, start sanding the edge, including the inner cuts. Before thoroughly polishing, dye the leather with your desired color. Create the pen holder by stitching its edge to the center; using a pen will help you maintain its shape. Glue along the sides and wait for 15 mins, but if you don’t have much time or don’t want to wait that long you may use a blow-dryer.
When the glue dries, make stitching marks and punch along the sides for stitches. Stitch the front and the inner parts together. A quick tip, use a stitching pony if you have to keep the pieces flat. Start polishing the sides with gum or wax and burnisher. You can now insert a notebook inside your handmade leather journal cover!
Conclusion
Leaping from the beginner to the advanced stage of leatherworking is exciting and overwhelming at the same time. Choosing between starting with molded projects like pouches and AirPods and phone cases and going for projects with many pieces like a bi-bifold wallet and leather journal can be difficult. It will always be challenging, but it’s great that you are up for the challenge. Just keep learning and working. Soon you’ll be a pro leatherworker!


