As a leatherworker, I always make sure my crafts have been stitched tightly and nicely. Good thing, I learned how to saddle stitch! Among any other leather hand stitching styles, this stitch is the most common. It is sewing with needles and thread in a way that creates two rows of stitching in a single row of holes. With a bit by bit procedure, one can achieve a strong and neat saddle stitch finish to hold cut strips of leather together
How to saddle stitch leather? To saddle stitch, you need to: get your workspace and materials ready, have your leather prepared (mark lines and make holes), thread needles, start saddle stitching and keep on going. When you finish stitching, secure it with a lock and you’re done.
In the world of leatherworking, stitching is the most basic skill any leatherworker should possess. There are different leather stitching styles and saddle-stitching is one. I know you are clueless on how to do so and I am here to help! Here, we’ll discuss the steps one by one. Keep scrolling and thank me later!
Be Prepared! – Tools and Materials Gathering

Needless to say, the first step for doing every project is to ready all the tools and materials you must have. Without them, any task would not be possible. The same way goes with stitching. Below are your must-haves to carry out the saddle stitching process:
Must-have Tools and Materials for Stitching:
You need two large needles, thread (can be a wax, polyester or nylon thread and scissors
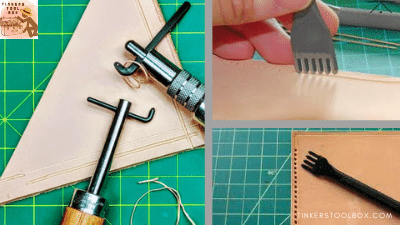
Tools and Materials Needed for Leather Preparation
Have a pencil, ruler, pricking Iron for hole making and a mallet
Setting Up a Good Working Environment
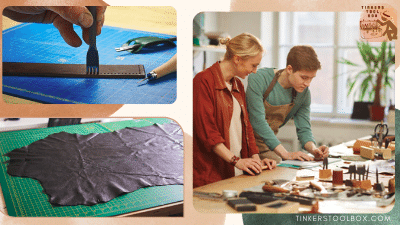
Admit it or not, a workplace that is hazard-free and convenient is what we always want. A workplace when doing needlework should be:
Bright: Should be of Enough Light
Appropriate lighting is a workplace necessity. In any setting, it makes all tasks easier and it let’s you concentrate on your work which increases productivity.
In needlework, light should fall on the working surface (where you do the stitch). and should come from the left side or front
Away from Children or Other Folks
To succeed in your craft, it is a good idea that you make yourself comfortable while working where you can harmlessly work, away from children or other folks where you can freely push and pull the thread without worrying of puncturing people surrounding you. Also, slight isolation from others while working is away from disturbance or distractions.
Leather Preparation: Marking Lines and Making Holes
Before starting the sewing process itself, you’ll need to prep the leather first. Here’s how!
Drawing Out a Line as Holing guide
Whenever we sew, we would always create enough space between cut edge and stitching line with the purpose of preventing unraveling of fabric edges, called seam allowance
To do so, get cut pieces of leather first. ¼ of an inch is the most common seam allowance. So now, with your pencil and ruler, measure ¼ of an inch from the cut edges of the leather and period-mark measurement. Afterwards, straighten out your ruler and mark with pencil to create your seam lines for all the edges
Pierce Leather with a Pricking Iron
Leather holes are where needles and thread are being pierced and would result in holding cut strips of leather together.
To put holes on your leather, have the pricking iron with you, place it on top of the seam line and carefully mallet-hit it. Redo until you produce enough holes
Prepping Needles and Thread
The first step when sewing every garment is cutting thread and threading your needles. Also, materials of the right kind and proper measurement matters. Know all of it below.
All About The Thread
Most Recommended Thread to Use: Wax Thread
Wax thread is easier to work and stops unraveling because of the stickiness that the wax gives.Use thick ones to avoid tearing once threads are pulled tightly when stitching
Polyester or Nylon as Waxed Thread Alternatives
These threads withstands high temperature, durable and mildew resistant. These are made of synthetic materials and unlike wax thread, these two don’t require waxing. Cotton thread is a no, no in sewing leather because it will erode over time because of tannins in leather
Proper Measurement of Thread
As we sew, we make sure that we won’t run out of thread. So, measure seam that you will be sewing and multiply by 2.5 for enough thread to saddle stitch leather
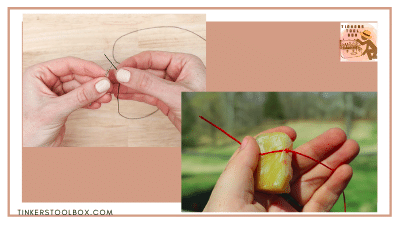
Thread your needles
In saddle stitching, there are usually two ways. You can either use one-hand or two hands and proceed with a double hand saddle stitching technique to sew. Then, threading needles would be a little different. Here’s what you should do in every technique:
For One-hand Saddle Stitching:
Here, just one needle is enough. To do so, thread the eye of the needle first. Next, pull the thread about a few inches. Lastly, lock the thread
For Double-hand Saddle Stitching:
This requires two needles. Threading goes the same way with one needle but the only difference is that needles are threaded on both sid that would result to two needles attached to a single thread
Tip to easily thread the eye of the needle
To save my time from threading,here’s what I always do. I flatten, pinch or wet the tip of the thread. Try it out!
Trick on Locking the needle into the thread:
After running the thread through the eye of the needle, pull it through further by about an inch. Next, pierce the thread with the pointed part of the needle. Then, push this loop around the needle upwards towards the needle eyelet. With the end of the thread that initially passed through the eyelet, pull out the slack that was created with this adjustment. Holding the needle, pull the loop over the eyelet to lock the needle in place
In this way, you don’t need to worry about your thread and needle be separated while in the sewing process
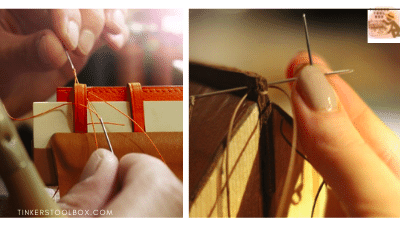
STARTING SADDLE STITCHING
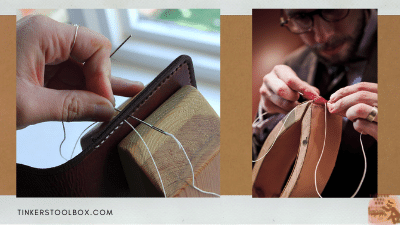
Saddle stitch fills in every stitch on both sides. When sewing in a saddle-stitch way, it is on your own preference to use either of your two hands or both in carrying out the stitch
One-hand Saddle Stitching
In the first hole, insert a needle then pull thread through leaving an inch long tail and pass it through the next hole. Then, go back to the first hole then the second hole again to lock the end of the thread. Normally sew the rest of the seam. When the end seam is reached, sew back the other way going through each hole in the opposite direction. You should fill in the opposite space between sewing holes. Bear in mind to tightly pull each stitch. When reached the beginning seam, lock thread using by backstitching a few stitches. Next, cut off excess thread close to the leather with a scissor and you’re finish
Double-hand Saddle Stitching
Start stitching by threading the first hole, pull through the thread and make the length of the thread even on both sides. Next, take the needle on your left hand and push through the next hole. Keep the right hand needle behind the left needle being pushed through and for a cross shape with both. Keeping the needles in the cross shape, push through the needle until the loose tail comes near the hole. Still pulling on both sides of the thread, feed the right hand needle into the same hole that you just pushed the other needle through. Now, grasp the needle from the left hand side and pull it through. After, let go of the needles on your both hands and pull the thread itself tightly so that the thread will not come off your needle. Repeat those steps until entire holes are stitched then lock the last stitch and you’re done
For a tip, using a stitching pony is a great help for you to hold leather in place with your leather but if a stitching pony isn’t available, placing leather in between your legs to hold the leather in place is okay
Preventing Work from Coming Undone: Locking Final Stitch
After sewing the seam all the way down, it is necessary to lock the thread to hold it in place
Locking the thread tips
While others do tie a knot at thread’s end, I recommend you not to do it. Knots will slip through the holes plus knots would make your craft somehow unpresentable. For a tip, use a backstitch which is done by taking one needle and passing it through the hole behind it. Now, pass the other needle through that hole from the other side. Keep doing this for about 3 or 4 stitches. Lastly,cut the thread ends
SADDLE STITCHING HACKS
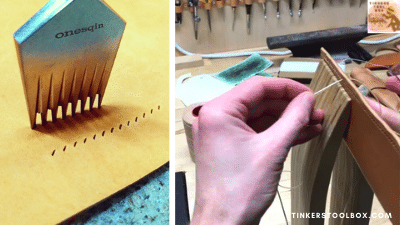
Make Proper Stitching Holes
Fork, nails or other alternative for hole making doesn’t guarantee a professional look. So, use a pricking iron and mallet-hit it properly
Be Mindful of Leather Thickness
Make sure to proportion the thickness of the leather you are going to sew with the thread you will be using. The thicker the leather, the higher the number for bonded thread is needed, the thicker the thread will be. That is why, for soft leathers, use #46 or #69 thread. For 3-5oz leather thickness (which is a little thicker), use #92 thread. Lastly, for 6-8oz leather thickness, a higher number of bonded nylon,polyester or wax thread is best
In addition, leather skiving is also recommended if leather’s too thick
Observe Hygienic Measures
In leather working, a leatherworker should hide hair for convenience. Also, do not bite through the thread with your teeth when working
Observe Safety Measures
When sewing, keep needles no closer than 35 cm from your eyes and don’t use rusty needles. One more thing, do not leave needles and scissors in the workplace
Conclusion
Every detail in your leathercraft matters. Stitching it nicely is necessary. Now that you know how to carry-out the saddle stitch, it’s time to get your needle and a thread and start sewing your leather together!