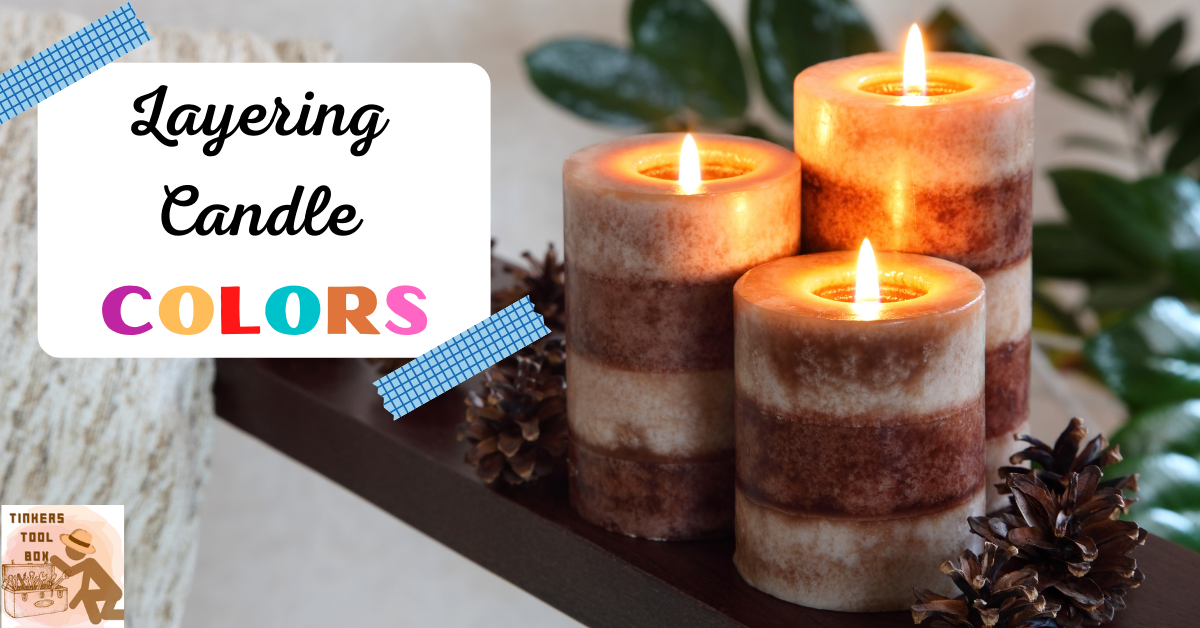
Candlemakers have creative hands producing beautiful burning candles which come in different styles and decorations. Colors are a big part of achieving these desired artistic works as they bring life to your simple candles. If you are used to a single-colored candle, you should definitely try layering candle colors. Here is a simple and informative guide to achieving your multi-colored candles incorporating as many shades as you want.
- Prepare the Needed Tools and Materials
- Choose the Wax Type You Will Use
- Choose Color Dyes for Your Candle
- Secure the Wick to the Container
- Divide the Wax into Three Parts
- Melt the Wax Using Double Boiler
- Mix the Color Dyes to the Three Melted Wax Portions
- Add Fragrance to Your Candle (Optional)
- Pour the Melted Wax into the Container
- Pour in the Second and Third Layers
- Let the Candle Cool and Harden
- Cost Estimate for Layered Candles
- Conclusion
Prepare the Needed Tools and Materials
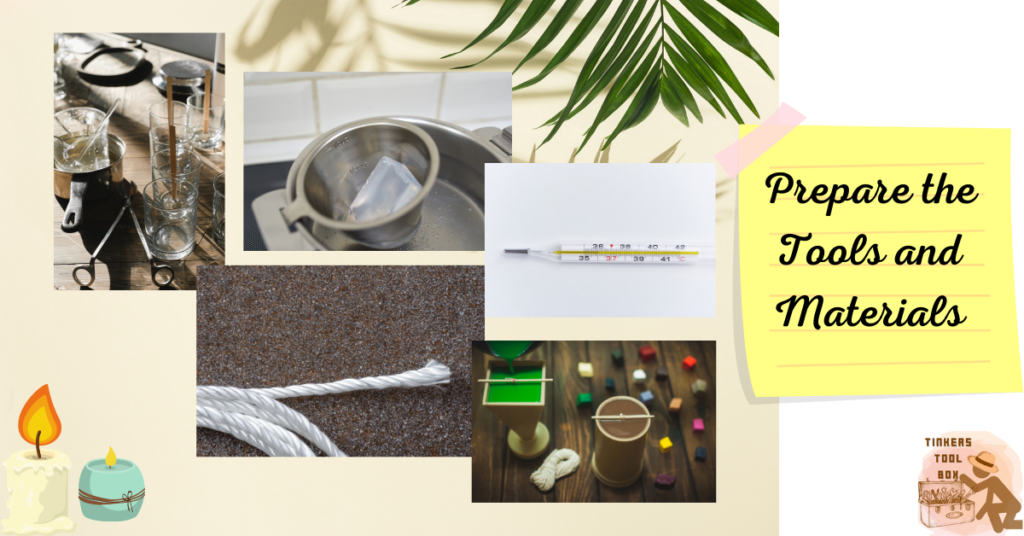
Here are the following tools and materials needed in layering candle colors.
Candle mold or container is one of the first things to prepare. Molds or containers purchased in candle stores or any non-flammable and heat-resistant container such as jars, pots, cups, or mugs will be a great mold. Any used or newly bought candle containers will also do so long as they are clean and dry.
Melting pots. I will use three melting pots corresponding to three different colors that I will layer for this project. The melting pot is where you will melt your wax, mix your color dyes, and add fragrances. If you like to add more colors to your candle, you’ll need more melting pots.
Candlewick. Here are some eco-friendly and non-toxic candle wicks you can choose from. Cotton wicks are known candle wicks that are easy to light and relight but prone to mushrooming.
Hemp wicks are coated with beeswax and burn slower and hotter. It has a rigid body which is perfect for thick and long tapers candles. We also have wooden wicks, a 100% natural wick, which burns cleaner and is perfect for natural candles.
Other candle wicks you can consider are paper wicks and zinc wicks. Paper wicks are braided with 100% cotton and paper and provide great firmness to candles. They produce a flame with body and brilliance.
Zinc wicks are cotton-braided wicks with an inner zinc core that provides maximum rigidity and strength to your candles.
A wick holder stabilizes your wick in the container and prevents it from getting bent while pouring the melted wax. We will also be using a double boiler to place your melting pots to melt the wax. A double boiler is recommended as it prevents moisture from contacting the wax, resulting in a white spot in your candle.
Use a pouring pot with a spout to pour hot melted wax into a container or mold. You’ll also need your thermometer to measure the exact and correct temperature
for pouring and adding fragrances and color dyes.
Lastly, a stirring rod to stir the wax while melting and mix dyes and fragrances to the melted wax. Note that you’ll need a separate stirring rod for each color so your candle layers will not mix.
Choose the Wax Type You Will Use
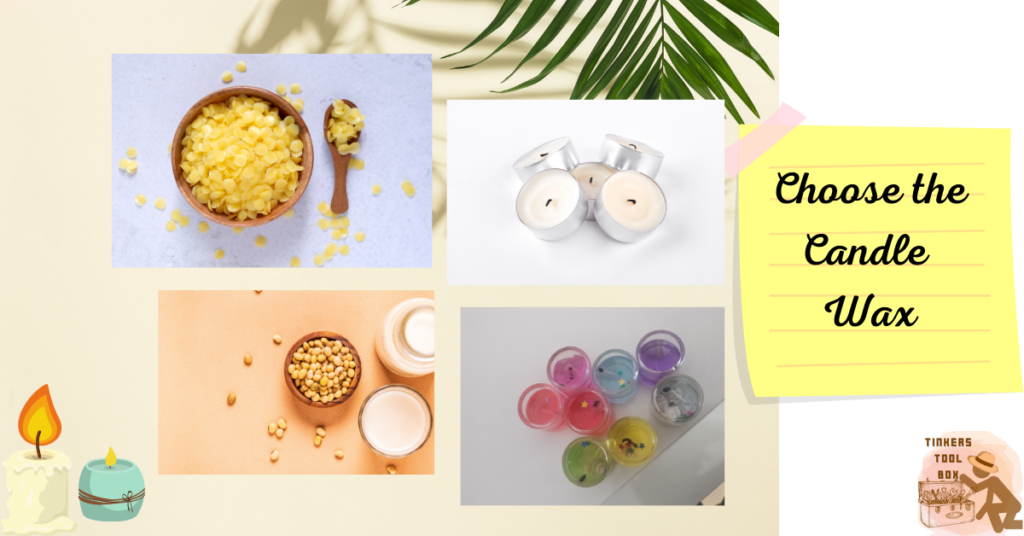
Here are some candle wax recommendations to help you choose the best wax for your layered candle.
Soy wax is a natural candle making wax made from hydrogenated soybean oil. It has a natural off-white color that serves as a good base for different candle colors.
Beeswax is another 100% natural candle wax considered the safest and healthiest candle wax to burn. It has a natural yellowish color and a sweet aroma from honey.
Paraffin wax, also known as straight wax, is the least expensive wax without additives. It is bright white and easily accepts coloring and fragrances.
Gel wax is great for creating scenic designs in candles. Coloring creates a clear hue and is harder to get a solid color from than other candle making waxes.
Choose Color Dyes for Your Candle
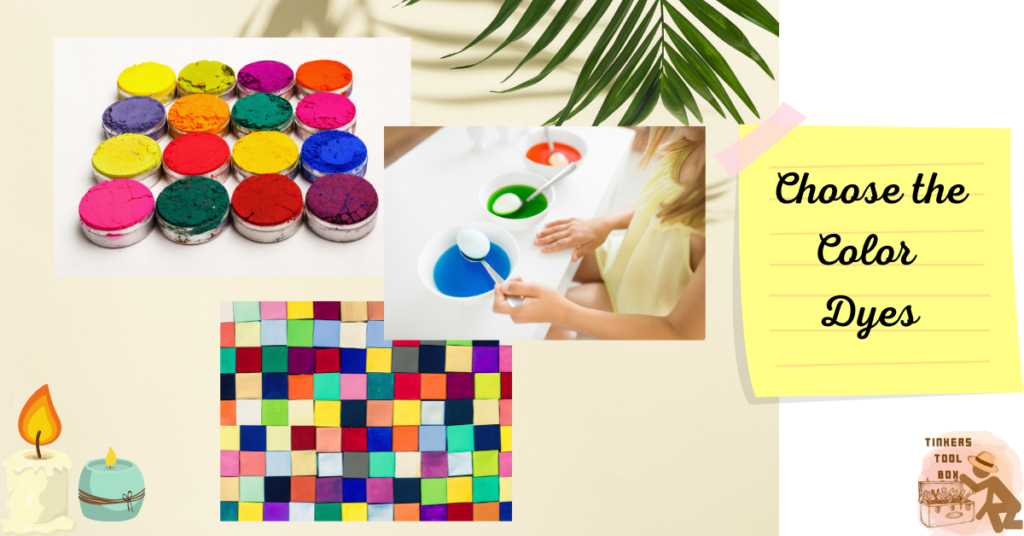
You can use numerous color dye types for a layered candle, two of which are liquid dyes and dye blocks. Whatever color dyes you would be using, always remember to use color dyes specifically made for candle making. Do not use crayons as they may produce harmful chemicals and undesirable smoke.
Liquid dyes diffuse and mix easily with melted wax since the liquid form does not need to be melted. These dyes produce lighter pastel shades for soy wax and light to dark shades for paraffin wax. They are perfect for mixing and creating customized colors. A small amount goes a long way for liquid dyes, and they are cheaper than dye blocks, costing $5 only for a two-ounces bottle.
Dye blocks are colors that need to be melted in heat together with the wax. They are better for darker and vibrant colors in soy wax, like red, green, and blue. They also work well with paraffin wax, coloring larger amounts compared to other waxes.
These types of candle dyes mix well with almost any type of wax. Smaller-sized dye blocks dissolve faster, so you can cut them into small pieces to melt evenly with the wax.
Secure the Wick to the Container
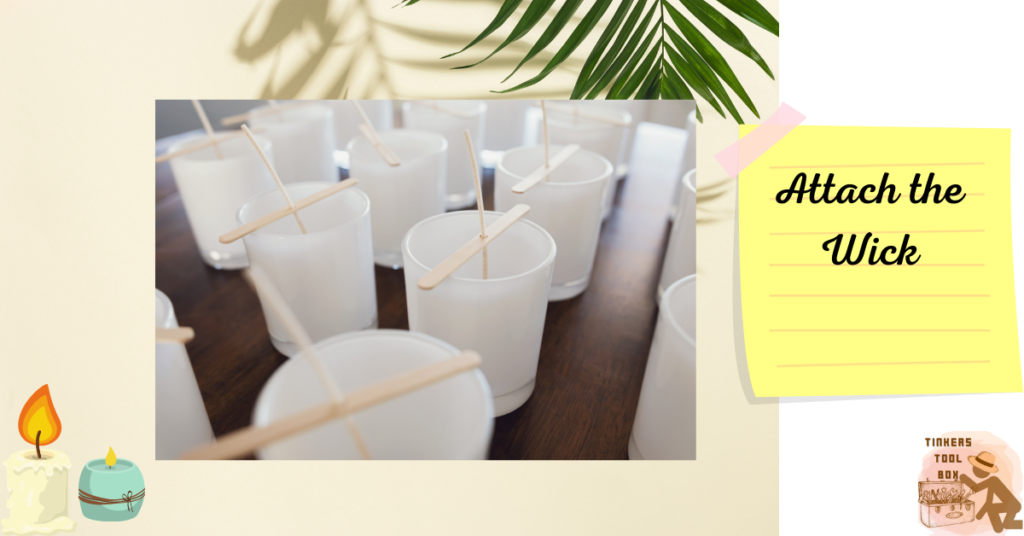
Measure a length of wick, two inches longer than your mold or container. Then, attach it to the container using the wick holder. Make sure the wick is standing straight when you attach them, as bent wicks will cause the candle to burn unevenly.
An alternative to using wick holders is the use of pencils or chopsticks. Attach one end of the wick to the bottom of the container using glue. Then, hold the other end of the wick at the opening of the container. Place the wick in between the two chopsticks or pencils, laying them horizontally on the container brim. The chopsticks or pencils will serve as the stabilizer of the wick throughout the pouring process.
Divide the Wax into Three Parts
The next step is to measure enough wax for your container. The amount of wax will vary depending on the size of the candle you are making and the size of the mold or container. For reference, four cups of wax make a large candle of four by four inches or three small candles of two to three by four inches.
If you are unsure about the amount of wax, you can measure your container’s volume or how much liquid it can hold. Use one fluid ounce equals one ounce of wax as your reference.
Divide the wax into three portions once you have measured the amount needed for your candle mold or container. Note that the wax is divided into three parts for three different color dyes. If you want to add more or fewer colors, the wax portions will also vary depending on the number of colors used.
Place each portion of wax into three small separate melting pots. Do not fill them up to the brim to leave some room for stirring and adding color dyes and fragrances.
Melt the Wax Using Double Boiler
Place the melting pots inside the double boiler and heat them over medium heat for 10 to 15 minutes. Use a thermometer to measure their temperature. They should not go above their melting points as they may overheat or combust.
Take note of the following melting points when heating your wax. Soy wax melts at 120 to 180 degrees Fahrenheit, beeswax at 143 to 149 degrees Fahrenheit, and paraffin wax at 120 to 150 degrees Fahrenheit.
Stir the waxes in each melting pot while melting to ensure that all the waxes are melted evenly before putting additives.
Mix the Color Dyes to the Three Melted Wax Portions
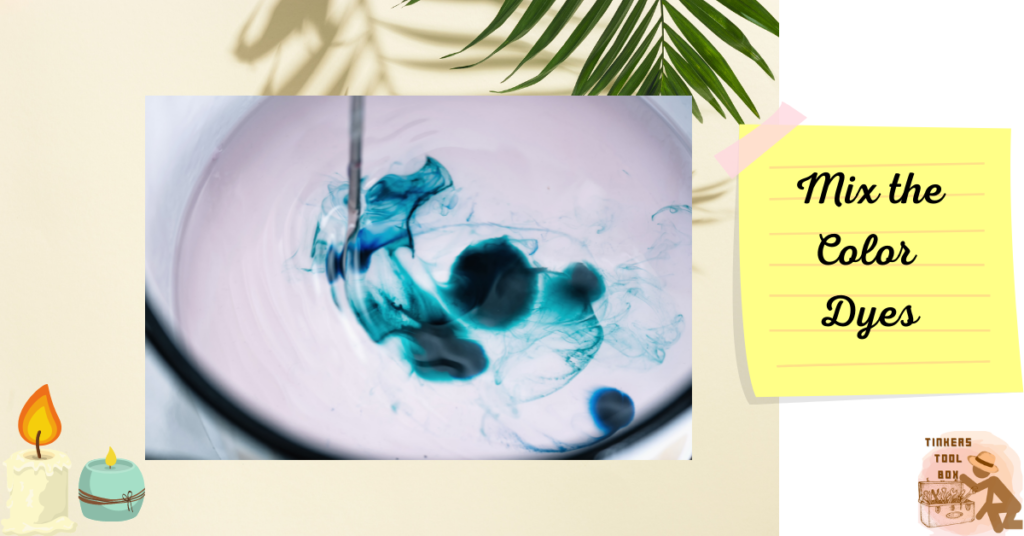
Prepare your color dyes. You can add the color dyes to the wax and melt them together for those using double boilers. It is recommended to add the color dyes at the hottest temperature of the melted wax. Stir slowly for a minute or two for the wax and colors to mix well.
Add a different color dye for each melting pot. Use separate stirring rods for each color. Note that even a small amount of dye combined with another would greatly change your candle’s color. Also, do not overdo stirring as it may result in bubbles on your wax.
Here are some color dye amounts recommended for you. If you use liquid dye and intend to produce medium shade colors like red, blue, and yellow, incorporate 0.05% dye into your wax. It means using a pound of liquid dye per 2000 pounds of wax or, in smaller conversion, seven to eight drops of liquid dye per pound of wax used.
For darker shades like burgundy or navy, you can add about 0.1% liquid dye and 0.005% for paler shades like peach or pink.
If you use dye blocks, add ¼ to ½ dye block per pound of wax used. Cut the block into smaller pieces for lighter shades and gradually add it to the wax until you get your preferred color.
The amount of color dye added determines the end color of the candle. It is advisable to experiment with different amounts of color dyes until you get your desired color. Remember, it is better to put additional color than to put excessive ones with no way of reducing them. So take your time gradually adding colors to your melted wax.
Here are some color combination recommendations. Add black dye to other colors for a darker tone and white dye for a more pastel and brighter tone. You can also mix colors for a customized shade. For example, red and blue, when mixed, create purple while adding three drops of red and a drop of blue color dye creates burgundy.
Add Fragrance to Your Candle (Optional)
Since we are talking about layering candle colors, adding fragrances is an optional step. But you may also want to include this as it takes a short time to accomplish and will surely improve your candle’s outcome.
You have two options in adding your scents. You can use one fragrance for the whole candle. Mix several drops of oils into your melted wax and stir slowly for about two minutes to bind it with the wax.
Another option is layering candle scents like how you layer your colors. Incorporate different fragrances for each color layer by mixing several drops of scents in each melting pot. After adding the color dyes to the melted wax, bind them together using a stirring rod for about two minutes.
You can either use fragrance oils, a synthetic fragrance, or go all-natural with essential oils extracted from real plants and herbs.
Here are the recommended temperatures to pour the scents. Pour scents to soy wax at 140 degrees Fahrenheit, 160 to 165 degrees Fahrenheit for the beeswax, and 180 to 185 degrees Fahrenheit for paraffin wax.
Here are some fragrance and color combinations you can try. Baked cookie fragrances would go along with candle dyes of gold, mahogany, and maple, while blueberry fragrances are perfect for blue, purple, and pink color dyes. Candy cane fragrance can be paired with cerise red, cinnamon, red, and white candle dyes.
Floral fragrances cater to various colors like pink, yellow, deep green, lime green, peach, orange, lavender, and apricot. For herbal fragrances, any shade of greens would look good for your candle. Honestly, there are so many options to choose from. You can even mix and match and create your pairing.
Pour the Melted Wax into the Container
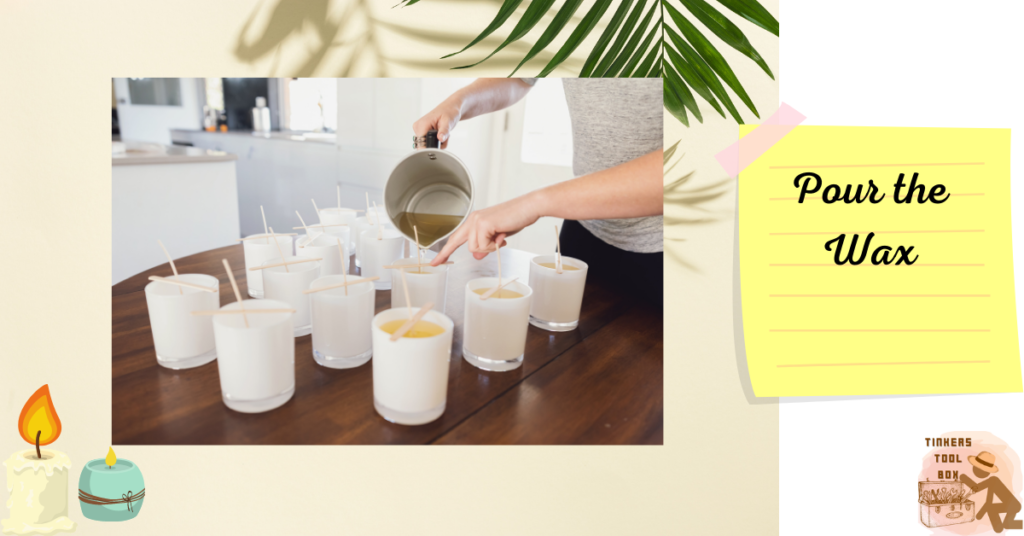
Remove a pot on the boiler containing your first layer of colored wax. Check the temperature of the wax in the melting pots. It should be around 158 to 167 degrees Fahrenheit before you pour them into the container. Remember to be careful not to let water mix with the two remaining melting pots in the double boiler. You can use a rag to dry off the dripping water from the pot you lifted off.
Carefully pour the first layer of colored melted wax into the container. Do not pour on the inner walls of the container. The melted wax should be directed to the bottom of the container to prevent spills and unnecessary colors on the sides of the container.
Wait until it’s the right moment to pour the second layer. A general rule of thumb is that it will take around 30 to 60 minutes to set a layer of wax. Pouring the second layer of melted wax too soon will melt the existing layer and make their color mix. Pouring the wax too late would make the first layer too hard to stick to the second one.
Experienced candle makers would be capable of telling when is the perfect time for the second layer. For starters, or if you want to be sure, you can use a wicking needle. Stick it to the top surface of the first wax layer.
When the needle comes off with the melted wax, it’s too early to pour, and when it comes off clean and dry, it’s the perfect time to pour the second layer. If the needle cannot go smoothly to the wax, it means the wax has already hardened, and you would be pouring a layer too late.
The poked holes have many purposes in a layered candle. First, it lets you know the correct pour time of the following layers. It also helps prevent bubbles or air pockets inside the wax that would not be desirable for candles. Lastly, the holes create tunnels that would help two colored layers to stick together perfectly.
Pour in the Second and Third Layers
Pour in the second layer of colored wax if the conditions stated above are met. Make sure that the wax is still at 158 to 176 degrees Fahrenheit before pouring. The following poured layers should be slightly hotter than the previous ones, about one to two degrees hotter.
The increase in pour temperature ensures good adhesion between layers as the heat of the new layer will melt just the top surface (one millimeter) of the existing wax and bind them together.
The set temperature should be maintained until the last layer of color. If the wax is poured with a higher temperature than required (excluding the one to two degrees increase), it will melt the existing layer of wax and will make the two colors mix. Hence your design layered candle will not be met.
Repeat the processes stated above when pouring in your third colored layer. If you are planning to create angled layers of colored wax, make sure the container is placed steadily while pouring the layers of wax. You may use adhesives to secure the container at your desired angle.
Let the Candle Cool and Harden
After layering your colored wax, let the candle cool for 30 minutes to an hour. Then, trim the wick and leave an approximately ¼ inch wick for you to burn. Let the candle rest overnight. After 24 hours of curing, you can now burn your candle.
Cost Estimate for Layered Candles
Here are some of the estimated costs for the materials and ingredients used in a layered candle.
- Candle wax
- Soy wax- $10 per pound
- Beeswax- $13 per pound
- Paraffin wax- $3-$6 per pound
- Fragrance oils- $16 for a set of six fragrances
- Candle dyes
- Liquid dyes- $14 for 24 assorted colors
- Dye blocks- $14 for 34 colors
- Candlewick- $5 for 100 pieces
- Wick holder- $8 for 20 pieces
- Containers and molds- $12 for two pieces
- Double boiler and a melting pot- $17
- Thermometer- $9
You can also buy a candle making kit with all the needed tools and ingredients for candle making. It will surely save you money compared to buying materials separately. I have an article on the best candle making kit on the market. Feel free to click here and visit.
Conclusion
Candles shouldn’t always be one-toned if you can make them as colorful and creative as they can be. With this step-by-step guide, you can produce a multi-colored layered candle with a bonus of layered scents in the easiest way possible. Now get your hands on the tools, materials, and ingredients needed for this project, and let us start bringing colors and life to your simple candles at home.