When it comes to candle-making, it is important that you have unique designs, especially when you want to make a profit out of them. Also, there is nothing better than personalized DIY candles that can deliver an all-new look to your home or your loved ones’ home. There are plenty candle making design ideas that you can do to bring your candles to a whole new level.
1. Mason Jar Candles: Simple But Cute
You can’t deny the cuteness and utilities of a Mason Jar, and transforming it into a candle is perfect. It may be difficult and messy, but with just simple instructions, you can create a unique and beautiful candle. Also, you wouldn’t have to wait to make more lovely, brightly colored for yourself or your loved ones.
To make Mason Jar candles, you would need the following materials:
- One pound bag of soy wax
- Wax colorant
- Candle pouring pot
- Medium-sized wicks
- Wick Stickums
- Wick holder sticks
- Wooden spoon
- Pint-sized Mason Jar
- Fragrance oil (optional)
- Cute material (to finish off the candle)
Soy wax is the easiest wax type to work with, which is why it is recommended to use for the Mason Jar candles. The wax colorants that you can use are chips, bars, or liquid, depending on what you are comfortable in using.
Before starting your candle-making project, you need to ensure that you have all the supplies above and whatever glass you choose to pour the candle into. The glass should be nice and thick since thinner glass can crack from the heat of the wax.
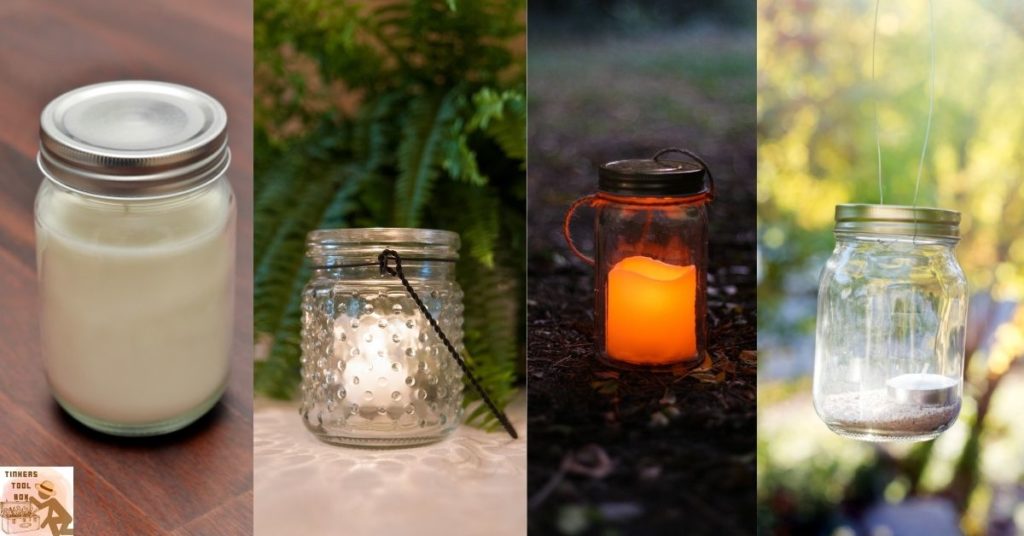
In this project, you won’t be needing that inner seal part of the mason jar lid, so make sure you remove it. Wipe out the inside of the jars to ensure they are clean and clean the surface to pour your candle wax into. For a pint-sized mason jar (five inches tall by three inches wide), it can take almost a full point of wax flakes.
Adding your wicks properly is important. Remember that some wicks are shipped or packaged looking a little crooked, but there is no need to worry since you can just run your fingers along the wick to smooth it out. Then, take your stickum and apply it to the metal base of your wick, which will then stick to the bottom of the jar.
Drop your wick into the jar and center it the best you can. You can use the end of a spoon to push the stickum down from at the bottom of the jar. The next thing that you would place is the wick holders. These are just two little wooden dowels with tight rubber bands on every end.
Pinch your wick and hold it in the center of your jar while you pour in the candle wax and while it is setting. Make sure to do your best to balance your wick right in the center, or else it will be crooked when the wax is set.
It’s time to melt the wax, and there are plenty of ways to do this. A simple process is to start by keeping your flame on the lowest heat possible throughout the entire process. It is better to keep the wax warm enough to melt. Make sure not to go to the point where it is boiling. Keep on stirring the wax until all your wax melts down.
Once the wax has melted, you can add any fragrance oil or essential oil to it. You can also add coloring or other designs that you want to have in the candles, such as flowers. Before pouring the wax into your mason jar, you have to ensure that the consistency is like the Slurpee that you get in 7-Eleven.
It usually takes about 20 to 30 minutes for the wax to cool to that particular consistency. Take note that wax will look darker when it is in the molten state.
Now, all you have to do is wait until it is fully dried, and you will have a mason jar candle that is beautiful, cute, and unique. Then add any labels or designs that you plan to add to your mason jar candle to make it even more beautiful.
2. Mini-Candles Using Silicone Ice Cube Trays: Make Pretty Designs

Aside from making ice in your silicone ice cube trays, you also might want to use them for making unique candle-making designs. You can create unique yet budget-friendly candles with different interesting shapes of candles. The process of making these candles are pretty simple, and anyone can do it, whether you are a beginner candle maker or an expert one.
Now, instead of pouring the wax directly into the mold, you have to use a candle-making syringe to pour the wax into the mold properly. You can also use soy wax for the wax material, and you would need small wicks and a stickum to keep it in place.
The materials that you would need for this candle-making project are cheap and easy to find. If you plan on selling these candles, you can sell them for a low price and make the profit that you want.
You can follow the process of melting the candle wax above as it will be the same process in making these types of candles.
3. Votive Candles: Creates A Beautiful Ambiance Lighting
If you want gorgeous ambiance lighting, there is nothing like candlelight. When you want to enhance a lovely dinner party and make it more special, then the best way to go is votive candles. These types of candles are made using votive molds that will have a unique crystal-like appearance that is complemented by their imperfections.
Here are the materials that you would need when it comes to making votive candles:
- Votive molds
- Pouring pot
- Wicks
- Old wooden spoon
- Candle wax (crystal palm wax)
- Fragrance
- Wick pins
- Flutter dies
Using crystal palm wax will provide a beautiful and unique look for your candles. It melts wonderfully, and just like soy wax, it is easy to work with. Every candle type will have a different appearance that will give the votives a rustic look.
You need to start melting your crystal palm wax on very low heat, and you need to make sure that you stir it constantly. When you keep the heat as low as possible and melt the wax slowly, there is a chance that you can eliminate the need for using a thermometer, which will keep the process simple.

A pound of crystal palm wax can make about ten votive candles. Make sure to keep stirring it and not let it burn or even simmer. If you want to add colors to your votive candle, you can use flutter dyes. They are cut and very easy to handle. It is a hassle-free way to color your candles.
You can use one flutter dye per pound, and it will give you a medium shade tint. Using two of these will yield a darker color, and using half will achieve a pastel look. When your wax is fully melted, then you can add your flutter dye.
Stir the wax until the dye, and the remaining wax is completely melted. Once the colors have integrated with the wax, remove it from the heat and add your scent. You can use up to 2.5 ounces of scent to one pound of wax.
Now, you can pour the melted wax right away into the mold; since waiting too long, the wax will start to cool. While you are pouring, the wax may harden a bit in your pouring pot; if this happens, just re-melt it. Don’t forget to add your wicks before pouring the melted wax into the mold!
4. Classic Multi-Level Wood Platforms: Perfect For Your Home
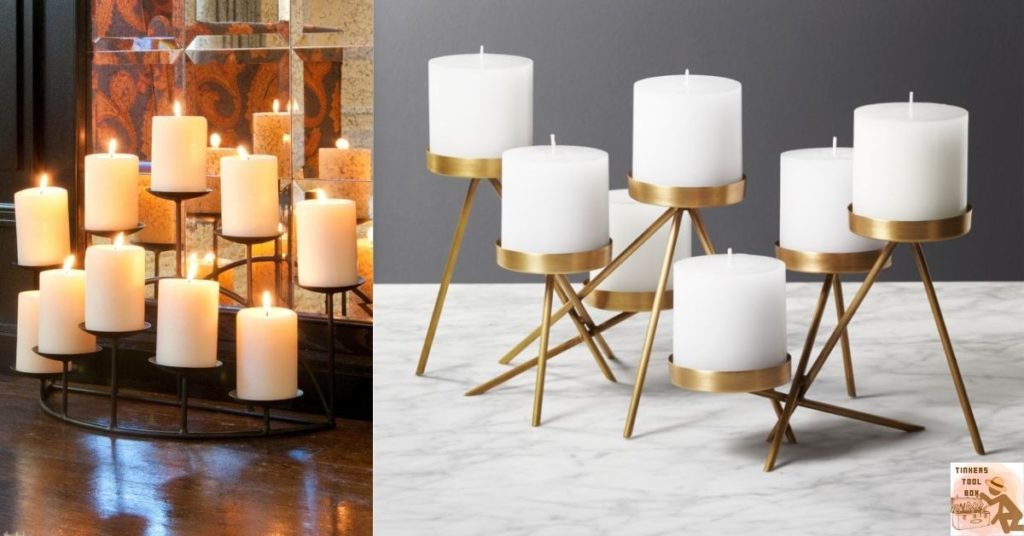
Here, you can use the votive candles that you have created by following the instructions above. It is a classy, affordable, and easy candle arrangement features with here wooden candle holders. The handmade finish of the candle holders shows round wood-carvings that are typical for the rustic style.
The descending height effect will create interest and harmony in the Feng Shui Style. The stain of the wood holders is dark, so it can contrast the walk chalk paint that you may have on your surface table. It can also match the sleek dark metal finish of any frame with your dearest pictures.
You can do this candle design in your home to have a touch of sophistication and elegance added to your living room or any part of rooms that you may have in your home.
5. Pressed Herbs Candles: The Feel of Summer All-Year Round
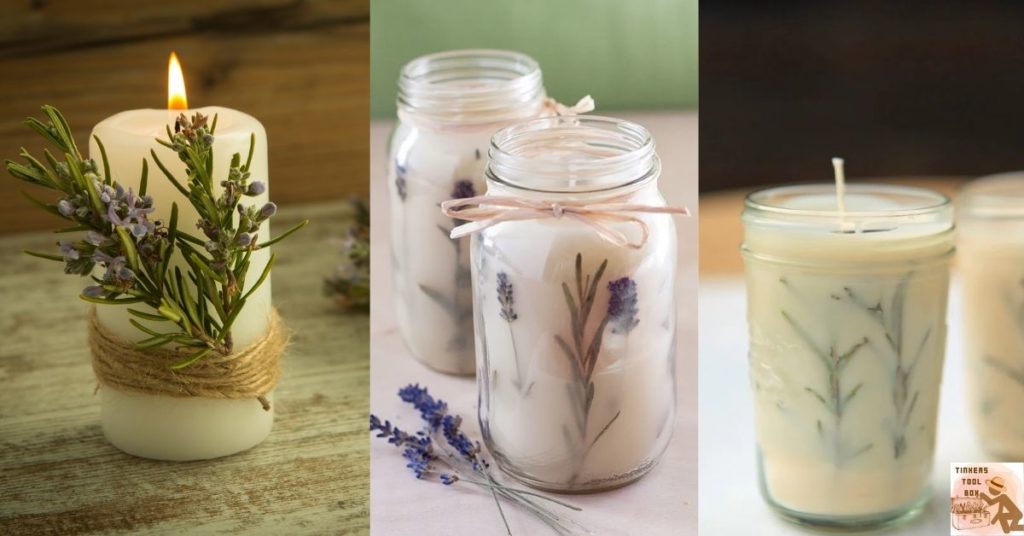
We all fall in love with the fresh herbs growing in our backyards during the summer season. Adding some herbs to your candles can bring you summer memories even in the fall or winter season. All you have to do is grab some lavender and chocolate mint, then add them to your melted candle.
You can place them on the sides of the jar that you will be using so you can see the design of the herbs or lavender on your candle. Whether you are new to the candle-making world or not, this is an easy project for your to do.
It would be a great decoration addition to any room in your home, from your living room to your office to the bathroom. Trust me, and this candle will help you relax and bring the smell of summer into any room in your home!
6. Color Block Candles: Using Crayons

When crayons break, there is no reason for you to throw them away and waste them. You can create them as color block candles which will be a great addition to your home decoration. Color block candles will add beautiful colors to a room and even create a tie-dye design for your candles.
Here are the following materials that you would need to create color block candles:
- Wax
- Crayons
- Wicks
- Votives
- Popsicle sticks
- Microwave
- Plate stand
First, you would need to pour a small amount of wax into a dixie cup and then microwave it for a minute. Stir and pour a thin layer into the bottom of the votive and place the candle wick in the center. Let that harden for a bit.
Next is to prepare your crayons by using a Xacto knife to peel the paper. Make sure to use one crayon per color, fill the dixie cups with wax, and then top it off with a broken-up crayon. Microwave that for two minutes, take it out and store. Then, microwave it again for another two.
The goal for this candle is to create angled layers of color, so let the first layer dry for 20 to 30 minutes. Turn the votives around, and then pour the second layer, so you get another angle. Let it dry again for 20 to 30 minutes, and place the votive flat on your workspace to pour in the third layer.
You can add a bright-colored crayon on the last layer to give it a nice finish. If you want to know more about making crayon candles, here is an article that I have written.
7. French Vanilla Candles: Great For Your Body and Mind

The warmth that the candle provides has been proven to be good for your body and your mind. With the French vanilla candles, it is made with coffee and vanilla beans that will release an awesome fall aroma which will leave you feeling amazing.
It will not only be good for you but also will make your house feel much more warm and cozy as the night slowly creeps in. The same process would be done here as the processes that I have mentioned above in making the candles.
The only difference is you would use whole coffee beans, whole vanilla beans, and french vanilla fragrance oil to achieve the French vanilla smell for the candles. Mixing all of these would provide a stronger scent for your candles.
If you plan to use essential oil, make sure to use 200 drops for every four ounces to get that noticeable scent.
8. Champagne Flute Candles: A Unique Take On Candles

When you have extra champagne flutes lying around, you can use them for your candle-making projects. The romance that champagne glasses bring can always set the mood, especially if it’s a candle, no matter what the celebration is.
Not only that, the champagne flute candles are cost-friendly and making it is as easy as it can be, especially since most of the supplies that you need are probably in your home already.
9. Floating Votives With Twig Accents: An Elegant Touch
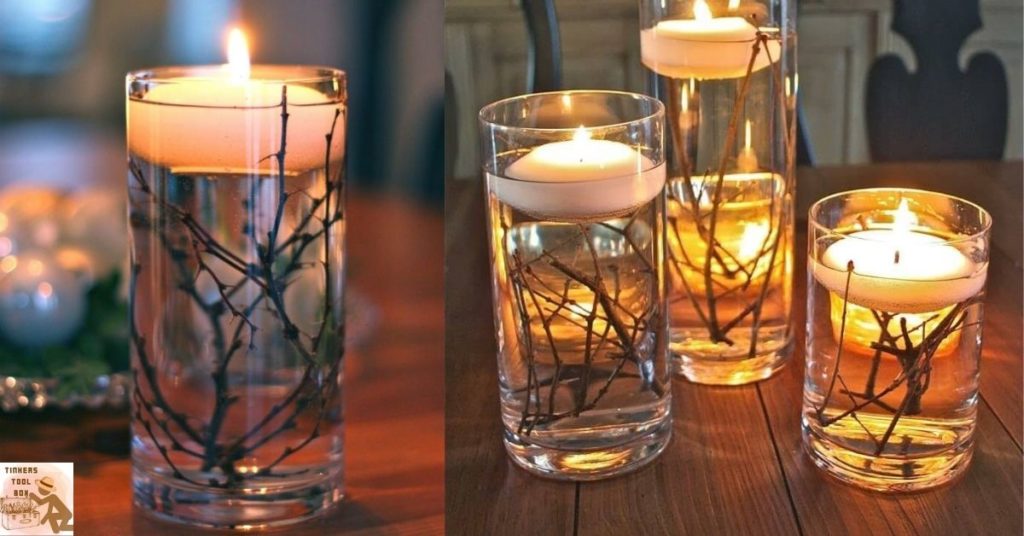
One of the most DIY candle decoration ideas is floating votives since they look amazing and can match almost any candle holder design that you may have. You can do different designs as you please, such as adding twigs into glasses and filling them with water.
Doing this will enhance the cozy vibe in your home interior or will provide a hint of connection with nature in a contemporary designed home.
Aside from that, you can also place marbles instead of twigs inside the glass and fill it will water, then add your votive candles. It will also provide a touch of elegance and sophistication in any room that you may have in your home.
It is a pretty easy design to do and affordable since some of the materials you need may already be available in your home.
10. Fresh Flowers and Stemware Candle: Repurposing Your Glasses

Just like the champagne flute, you can repurpose your glasses into a beautiful candle holder design with just three simple steps. You also have to find a tray where you can place the glasses, candles, and flowers on. All you have to do is turn the glasses upside down and let one of them cover a bloom.
The base of the glass become will turn into the support for the pillar candles. It would be great if you had about three to four glasses, and the finished arrangement will look like a specialist’s creation.
It will not only look good for your home, but it would be great as a centerpiece for a wedding celebration if you are looking to save money on your wedding day.
11. Glittering Bird Cage Candles: The Perfect Design for Any Home
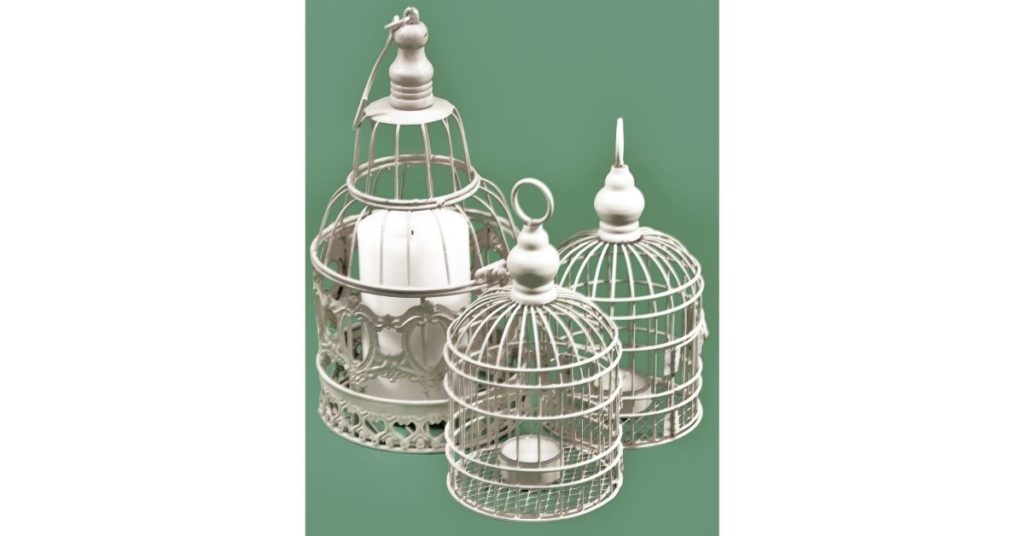
Birdcages are great for repurposing different designs for any occasion. There are instances where bird cages are turned into spring or wedding decor by filling them with different vines or faux flowers. Another way that you can repurpose bird cages is by using them as candle holders.
It will provide a wonderful interior effect, and you will only have to worry about the candles that you will place inside the cage. You can place about two or three candles with identical or matching surfaces. Then, you would cover them with the birdcage.
12. Rustic Candle Lantern Arrangement: For The Minimalist Design
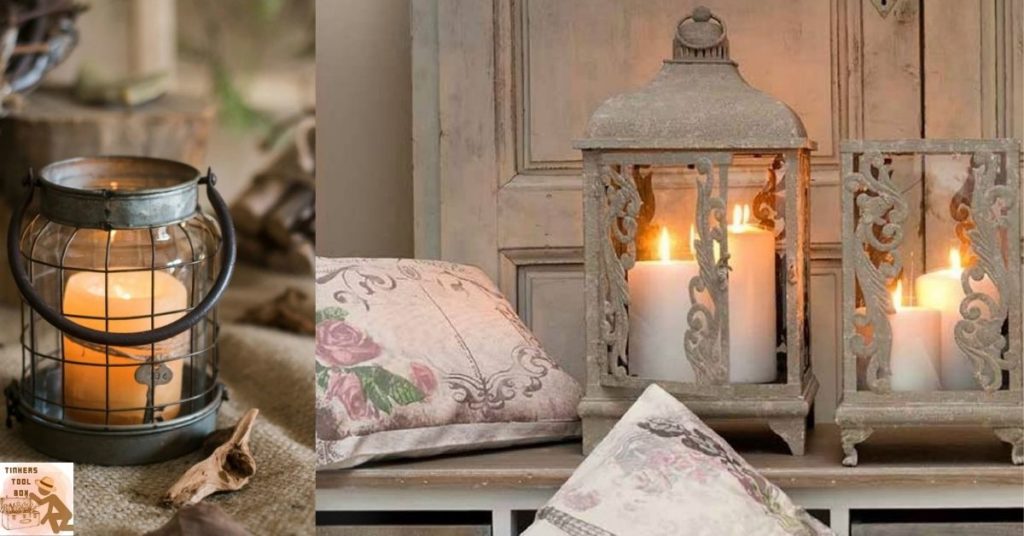
The rustic candle lantern arrangement will make the perfect corner piece in your home. You can place it on a side table or a stool whenever you need it. The table or stool can have a distressed surface to give it a warmth and cozy feel.
To make it more welcoming and additional lighting, adding candles inside later would be the perfect touch to the rustic design that you want to achieve. To make the design feel like belonging to a particular setting, place them in a plain glass lantern to add another rustic element.
Final Thoughts
Whatever design may float your boat, you have to make sure that it can match any setting that you have in a particular celebration or home. From a budget-friendly to an extravagant design, you can achieve the look that you want with any candle design that you please. Some of the candle designs I have provided above can be achieved by just using different things around your home. If you want to learn more about candle making, you can read this article that I have written, where I have listed the different workshops you can attend.