It is the season of gift-giving, so it would be best to add a little bit of personality to your gifts to family and friends. These luxe leather gift tags would make everything look expensive and sophisticated underneath the Christmas tree. In this article, learn more about making leather gift tags that are perfect for the Christmas season.
We will be creating standard leather gift tags using the following tools and materials:
- Vegetable-tanned leather hide
- Leather scraps
- Leather scissors or shears
- Mallet
- Protective rubber board
- Alphabet stamping kit or any stamping kit you want to use
- Round leather drive punch
- Edge beveler (optional)
- Wood slicker (optional)
- Various designs of cookie cutters
- Ribbon or baker’s twine
Step One: Finding Leather Pieces

First of all, you must think of what shapes you want your gift tags to have before cutting any leather hide for this project. This will give you an idea of how much leather you should have to have enough hides for this project.
Remember that you can use brand new vegetable tanned leather hide, or you can also use scrap leather that you have from your past projects. Scrap leather is much better to use since it is environmentally sustainable. It will save you money because you do not have to buy new yards for this project.
The tags are small enough to be done on scrap leather, so this should be a plus for you. For more scrap leatherworking projects, you can click here for my suggestions that you can also make gifts with these gift tags for your loved ones.
Step Two: Dyeing Your Leather Pieces

If the leather hides you have are not in the colors you like, you can dye your leather pieces for a better aesthetic.
Always remember to ask your leather goods store or any expert for dyeing tips because it can be a time-consuming process, only to find out that the color you want is not the one you got in the end product.
Thus, you must be careful in dyeing your pieces to prevent them from getting ruined in the process and after the procedure. I have written a good article on dyeing leather, which you can read here for reference.
Step Three: Tracing Your Shapes
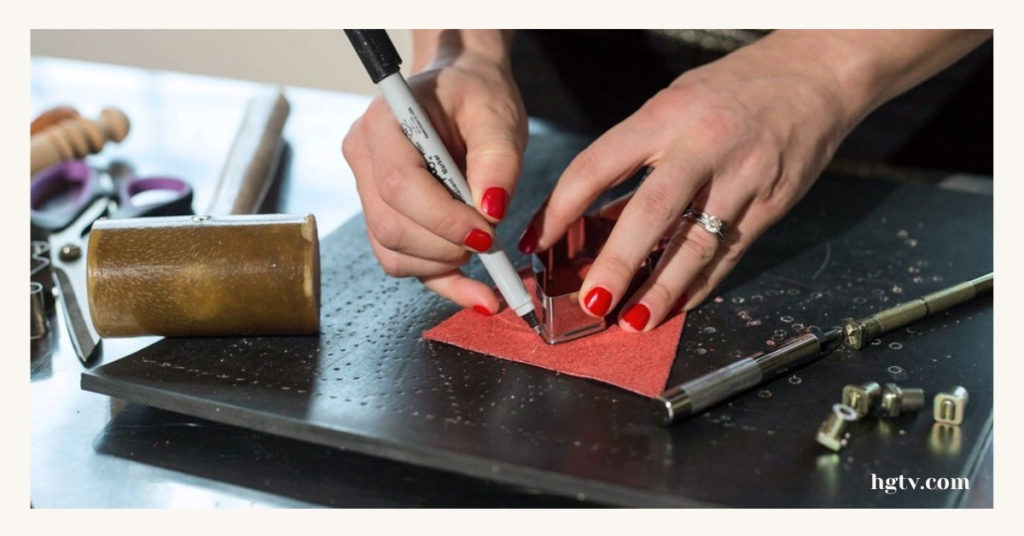
Now that you have determined which kinds of leather you are using for this project, you can now cut them into shapes or sizes, depending on your preference. You can use cookie cutters shaped into pine trees, cane candy, Santa’s hats, socks, and any other shapes you have at home.
If you are more on the simple side, cutting them in strips or rectangular or square pieces would also work for you. You must ensure that you have enough leather for your pieces and if you do not have extra yards, make sure that you will not make mistakes.
Leather is expensive, and it can ruin your entire project since they will not look alike anymore. Lay your leather pieces on a smooth, flat surface, then carefully cut the leather using cookie cutters. You can leave a trace there and use a pencil to trace the outline of your preferred design on the surface of the leather. Ensure that there will not be any crumbs on the surface because they might crook the lines.
Lastly, make sure that your cookie cutter is stably placed on the surface. Do not move the cookie cutters while tracing the patterns because it might damage the leather and ruin the entire project for you. It is also for safety concerns because some cookie cutters might be too sharp around the edges.
Step Four: Cutting the Shapes

Now that you have successfully traced the shapes of your cookie cutters onto the surface of the leather, now is the right time to cut them carefully. Using a pair of sharp scissors or shears, cut the leather depending on the shape of your cookie cutter as carefully as possible. You do not have to worry about the frayed edges. You can always finish them with an edge beveler after cutting them into desired shapes and sizes.
It is not a flaw for you if you do not take care of the frayed edges because it adds to your leather gift tags’ overall charm. It will also age well, adding to the charm of the project. However, if you are more on the clean-cut side, make sure to fray the edges carefully so that they will not rip anymore or cause more damage.
Burnished or not, these leather gift tags would still look beautiful once you complete the making process properly and correctly.
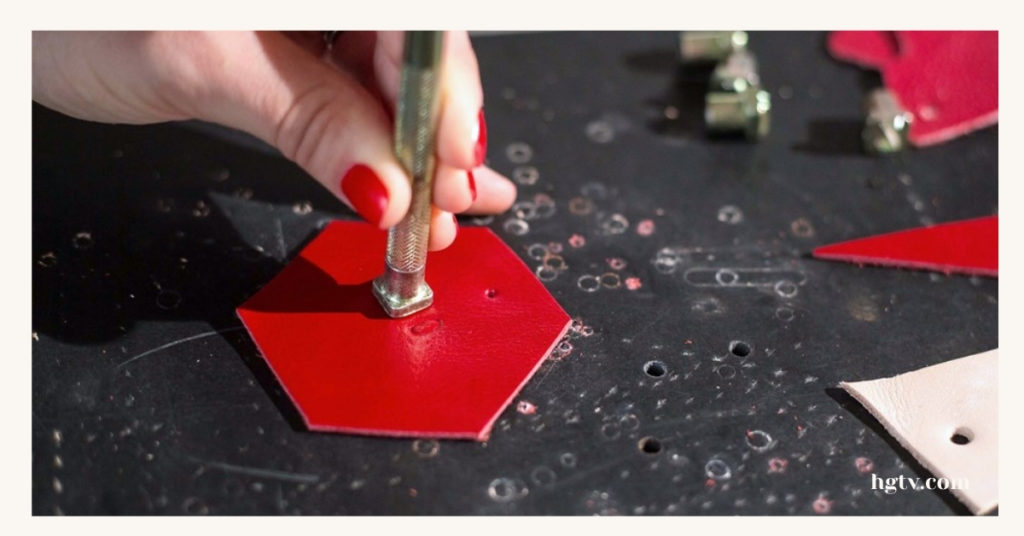
Step Five: Punching a Hole
After you successfully cut the leather pieces into shapes and burnished the edges with your edge beveler, it is now time to punch holes on your leather gift tags.
It will not serve its purpose if it does not have any holes, so be careful in punching holes on your leather pieces and shapes. Grab your mallet and a round leather drive punch, then lay your leather shapes on the protective board. Doing this step is important because the pressure from the mallet might puncture your surface, and it will not look pretty in the end.
This will also protect your surface from unnecessary nicks and cuts that can hurt your leatherworking projects in the future. Then, gently strike the round leather drive punch on the top center part of the shape, or basically anywhere you want to have, as long as they are on edge.
After striking, make sure that the punch has imprinted the hole perfectly without tearing the edges apart. Be careful with the mallet, too, because you might strike your fingers instead of the round leather drive punch. Do this step to all your gift tags. Then set them aside.
Step Six: Stamping the Names
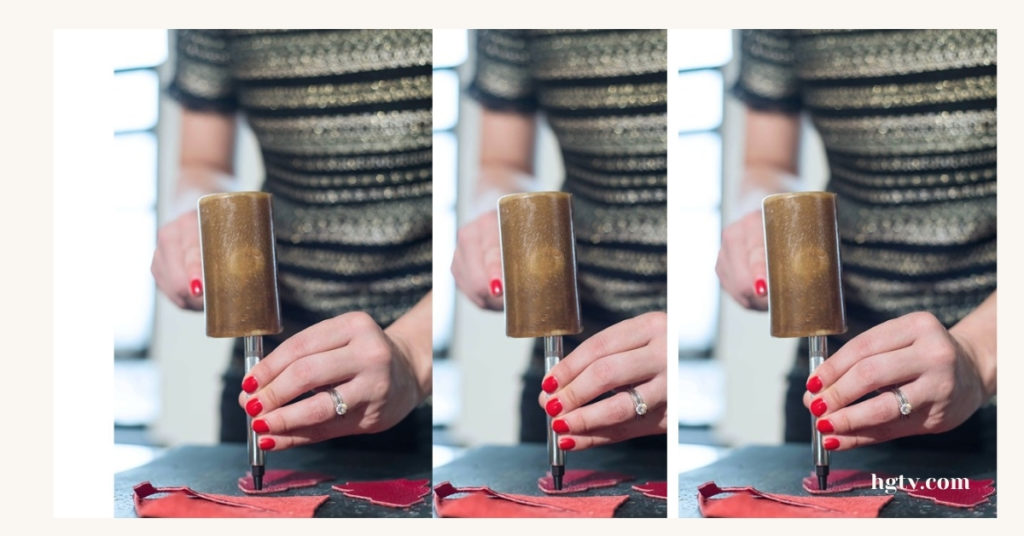
This is one of the fun parts of creating leather gift tags. You can stamp the names of the recipients of your gifts on the surface of the gift tags using your alphabet stamping kit and a mallet, if necessary.
You can use a mallet if you do not have enough strength on your hands and wrists but do not hit the stamps too hard, or it will be too deep. Strike a balance with the precision and accuracy of your mallet strikes to imprint the letters properly. Striking them too lightly might not even allow you to stamp the letters properly.
Start stamping the names of the recipients of your gifts on their separate gift tags. You can also use phrases such as “Happy Holidays” or “Merry Christmas” or basically whatever phrase you want to put there. Another option is stamping signs and symbols on your leather gift tags to show your personal taste on the gift tags.
You must remember that you should do this step without anyone sleeping or cannot be bothered because this is a noisy step to do. You should never do crafting during the late hours of the day or the early hours of the morning, especially if you live in a condo or an apartment. You might get complaints from your neighbors who are trying to sleep because of the continuous striking of the mallet.
It would be best to try doing this in your workshop or anywhere where you can be noisy without worrying about other people. Also, you must ensure that all the letters are properly aligned unless you are doing it on purpose. Once you stamp the letter on the surface of your leather gift tag, it will not be reversed, so you must be extra careful when doing this particular step.
Step Seven: Painting The Letters On The Surface
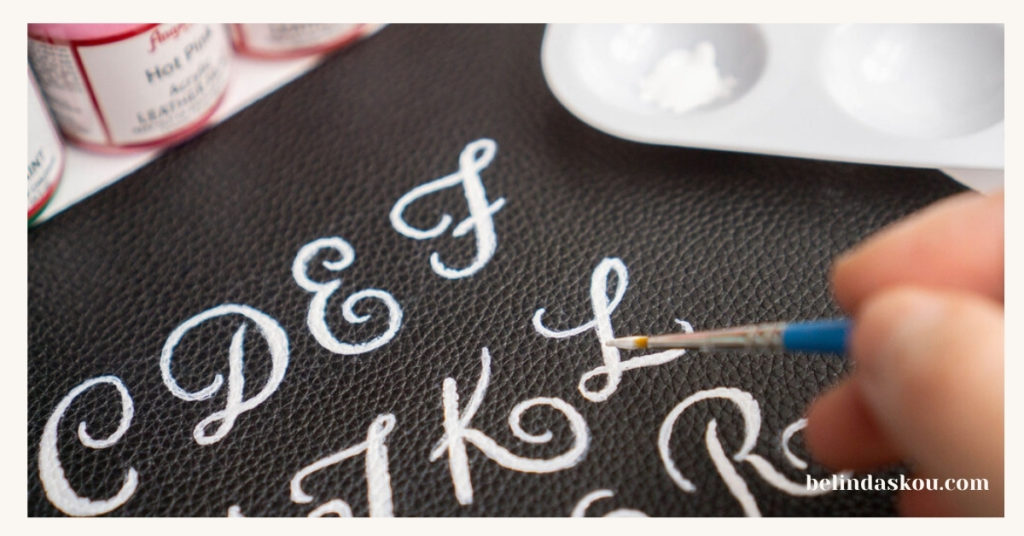
If you are not confident with your stamping skills, or if you do not have enough time to stamp a hundred names on your leather gift tags because you are pressed for time, you can simply write the names on the tags using a marker or paint that you can use for leather.
If you are using paint, you can consider using white or metallic colors such as silver and gold for that added shimmer. That would add another level of style to your leather gift tags. You can also use metallic-colored ink for your permanent markers.
However, if you choose this step, you must be extra careful because it would be hard for you to erase any mistakes in strokes or if you happened to leave a blob on the surface of your leather gift tags. Focus on writing the names and ensure that you have written everything correctly to not break the hearts of your family and friends.
Leave them to dry for a couple of hours or so before attaching the strings to your leather gift tags. That would prevent your paint from smudging in case you touched them with your fingers, ruining the gift tags in the process.
Step Eight: Using Ink Stamps for Letters

Another thing you can use in putting names and words on your leather gift tags is ink stamps. You just need to buy a good stamp pad with the color of the ink you want to use for this project to show you your personality while giving out gifts for your friends and family. The first thing you must remember when using this technique is to find an ink brand that will work on leather.
Thus, you must find an ink brand that stays on almost any surface. Else, your efforts will be in vain as they will eventually fade in the long run, which can be frustrating and disappointing to see.
Choose an ink color that will not blend with the leather, especially if your leather is a bit darker. Black or brown can be good ink colors for your stamping pad. Also, make sure that it dries quickly and will never smudge when it gets dry. Line your leather gift tags and with the ink stamp, start stamping your leather gift tags with one heavy press. Then, you must let it dry out in the open.
The process will only take you a couple of minutes or so unless you are stamping one hundred gift tags for your friends and family. Nevertheless, it is still an easy option if you are not confident in stamping using the leather stamping tools.
Step Nine: Finishing Touches

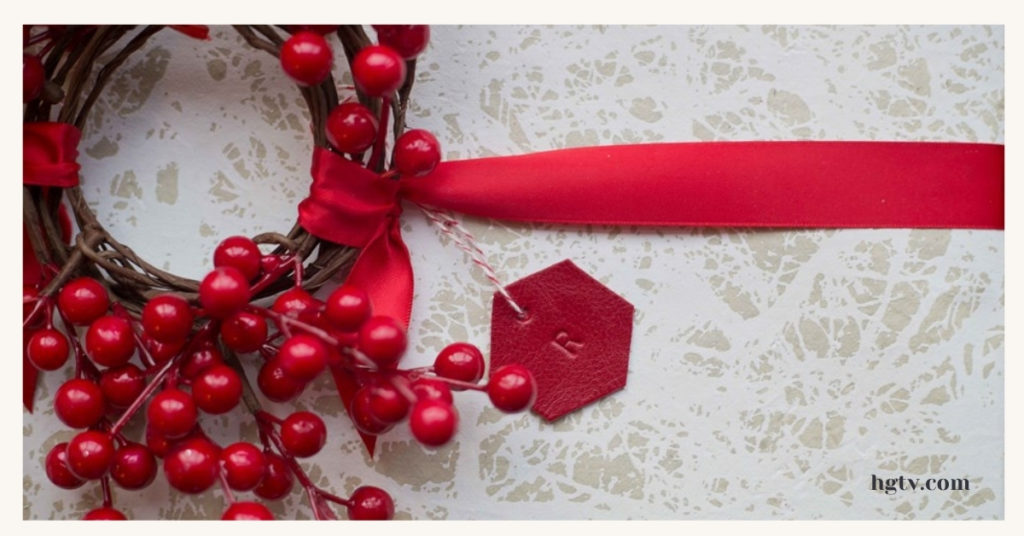
Once you have perfectly stamped the name, phrase, or anything you have stamped on the surface of your leather, you can now put the string on the leather gift tags by inserting them into the hole you once punched earlier.
While the length should be up to you, you should remember that you are making gift tags and not necklaces. Thus, it should be just the right length, about four inches would be fine. That would be enough length to keep them hanging on the bags or boxes or wherever you put them for gift-giving purposes.
You can use a piece of ribbon or some baker’s twine as the string for your leather gift tags. You can choose the color of your twine or ribbon that matches the color and texture of your leather gift tags for that added charm and style.
Step Ten: Put Them On The Gifts
Now that you have finished doing this on your leather gift tags, you can now attach them to your gifts.
For instance, you can attach them to the handle of the gift bag or tie them around the box if there are no handles available. You can also wrap them around your table napkins and use them as a great identifier for your loved ones on Thanksgiving and Christmas dinners.
End Product: Leather Gift Tags With Multiple Purposes
After this project, you can finally hand out your gifts with style, thanks to these leather gift tags. Aside from its intended purpose, the recipients can also recycle it as keychains, charms, luggage tags, bag tags, or even bookmarks for their journals and notebooks. These leather gift tags would give you the impression that you have spent a lot of time getting the perfect gifts for them, which will truly touch their hearts.
Watch as your friends smile in happiness when they see your freebie leather gift tags along with their gifts for the gift-giving season. Celebrate gift-giving in style with these sophisticated-looking leather gift tags, and you will be the star of the show come holiday season.
If you want to take it to the next level and create leather gifts for your friends and family, you can check my articles here and here for more inspiration. Or you can also take it to another level and create DIY monogrammed leather keychains or leather travel tags with a similar purpose! Happy crafting!